
recording studio
(rɪˈkɔːdɪŋ ˈstjuːdɪəʊ)
Today we had our first visit to the Recording Studio. We experienced studio tour,basic operation of mixing desk, wiring up a mic, and introduction to recording from the mixing desk.
A very important rule of the recording desk is

- Band Recording.
- Sound Effects.
- Theatre.
- Film.
- Foley.
- Audio Books.
- Voice Overs.
- voacl Acting.
- Music
- Bands
- Singers
- Soloists
- Games
- Soundtracks
- Voiceovers
- Effects
- Radio
It is perfect for the task of capturing audible sources due to the following characteristics/benefits
- Isolating Individual Aspects.
- No/Less Spill.
- Re-record.
- Easily Modified.
- Edit Separate Tracks.
- Easy to Edit.
- Control Over Mixing.
- Click Track – Metronome.
- Accurate Capture of Sound.
- high quality/Expensive Equipment.
- Room Acoustically Treated.
- Range of Equipment.
The studio seems like a standard set-up with a control room and a large isolation booth.

Both rooms are acoutsically treated to avoid any ‘colouration’ of the sound, we are looking to recording sounds as they are orginally intended, bad acoustics and sound polluton (spill) will effect pour final output. We need to be sure the recording will sound the same whereever it is played. This acoustic tramtn has various guises with roof baffles, darped heavy curtains and wall mounted baffles. Also contributing to this is the sepration wall and rthe double door enterance. These absord the sound and change the room shape thus reducing and altering the paths of sound reflections.
Control Room
The largest piece of equipment in the control room is the mixing desk.


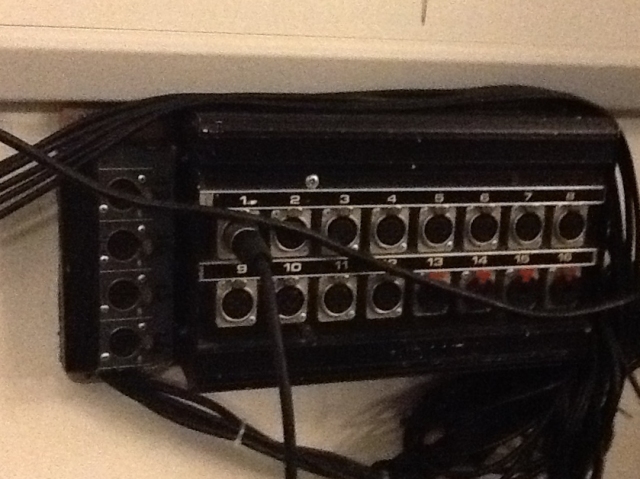
The desk is ‘Midas Verona 320’ (1287247400-midas_verona_manual) which has 16 inputs from the control room hardwired into it.. These channels are inputted via multicore from the isolation room. Within the isolation room is a patch bay for xlr‘s (sound cables). These are numbered and each number is routed to the relevant channel on the mixing desk.

Large Isolation Booth
This is the room where the artists to be recorded are situated. There are drum baffles, these are panels which fit round the drum kit to avooid sound spill, also in this rrom are headphones for montoring and talkback, xlr cables, mic stands and the multicore patch bay.
Wiring up the desk
The desk is pre-wired so we shouldn’t need to change that at all. However before recording we need to set up the levels. This is done by.
- Ensure everythuing fadedrs and pots are zeroed.
- Move the gain pot on the desired channel ideally the LED meters would be showing green with occasional amber – avoid the red LED.
- Move master fader (red one) up to 0db.
- Fade up the channel that you are recording from.
- Repeat process for any other channels.
Remember phantom power if required.
If artists want to here themselves aux 1 and 2 are the headphone pots.
Recording
For recording we use a Mac pro with Studio One software installed.
- Open Studio on1.
- Create new file
- Name it
- Add track
- Name track
- Select input channel
- On mixing desk use the central fader blue to send to the software.
- Pre-arm the track
- Press record on Studio one.
Types of Microphone
Dynamic |
Condenser |
| General use | Costly |
| Resilient (durable) | Non robust (delicate) |
| High volume levels | Heat and Humidity can effect recording |
| No internal amp | Requires phantom power (48v) |
| Don’t require external power | Sensitive |
| Moving coil (Dynamic) | Wide frequency range |
| Moisture resistant | Greater transient sound response |
| Cheap | Expensive |
| High SPL (Sound Pressure Level) | Some can change pick-up pattern |
| Tailored to frequency range | |
| Usually cardioid pick-up pattern | |
Uses |
Uses |
| Live band application | Vocals |
| Amplified Instruments | Acoustic Instruments |
Pick-up patterns of microphones
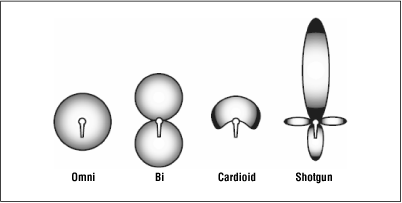
Cardioid – used in live performances, from karaoke to big arena concerts. Other common uses include miking loud instruments like drum kits and guitar speakers.
Omni – -You can use these mics in studios and other venues (like old churches) with great acoustics, and can also be used for live recording of multiple instruments, as long as the noise level is low
Bi or Figure 8 – 2 vocalists or instruments, radio interviews.
Shotgun – commonly used for film and theatre, they also make great overhead mics for capturing things like singing groups, chorals, drum cymbals.
Using microphone patterns effectively
Microphones in the studio
| Microphone | Type | Uses | Cost | Picture |
| Shure SM58 | Dynamic. Unidirectional | Stage – Vocals | £90 |
 |
| AKG 414 | Condenser. Large Diaphragm | Studio – Vocal Overhead – Acoustic | £1,500 pair |
 |
| Audix D6 | Dynamic. Cardioid | Kick Drum. Low frequencies | £170 |  |
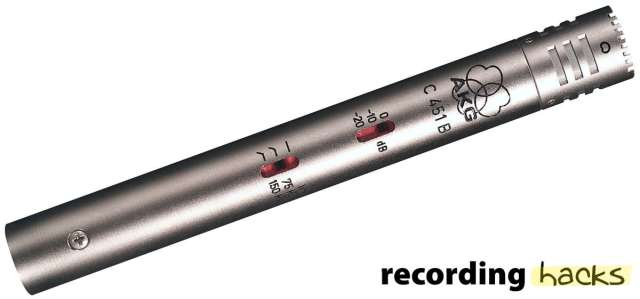
| AKG 451 | Condenser. Small Diaphragm | Overhead Vocal, High hat, percussion, acoustic guitar | £535 |
 |
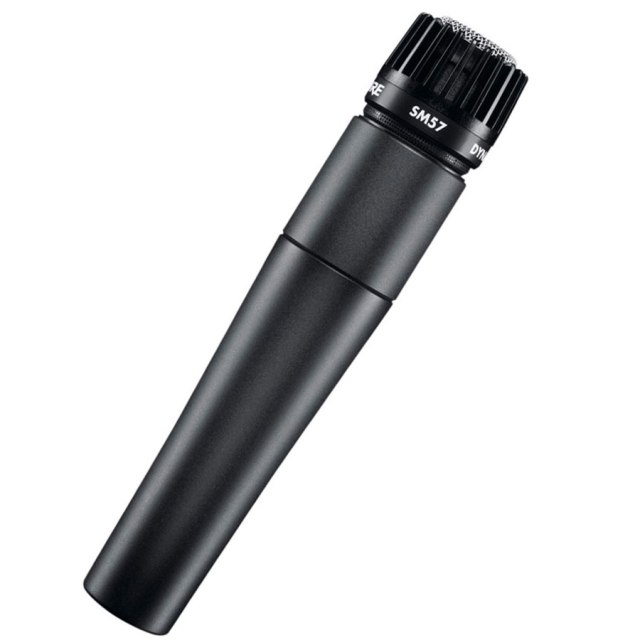
| Shure SM57 | Dynamic. Unidirectional | Amplified acoustic instruments | £90 |
 |
| Rode NT5 | Condenser. Small Diaphragm | Acoustic. Drum overheads, cymbals. Live performance | £280 |
 |
| Sennheiser E604 | Condenser. Unidirectional. Clip-on | Toms, Snares, percussion. Brass Woodwind | £240 |
 |
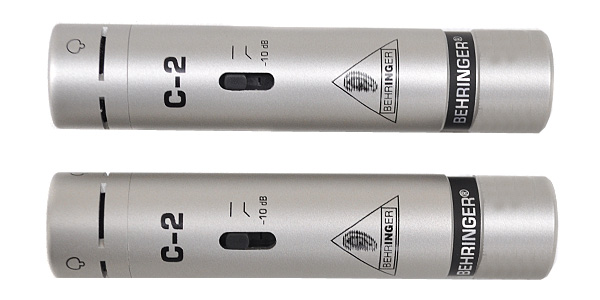
| Behringer C-2 | Condenser. Unidirectional | Piano | £45 |
 |
| Shure SM7B | Condenser. Adjustable frequency | Vocals. Talking | £360 |
 |
Wiring Up a Mic
This is a fairly staright forwad procedure.
- Choose the microphone for the given application
- Plug XLR cable of desired length into microphone
 Rear view of microphone showing XLR socket
 XLR
XLR - Fix microphone to stand and position in desired location
- Plug other end of XLR into desired channel on patch bay.
A Quick note on XLR cables, the end connectors on everycable are always paired. One being female (connector with holes) and the other being male (connector with prongs) as such it is next to impossible to wire these in incorrectly. As can be seen in the pictures above the femal end will go to the microphone and the male end will got to the patch bay. This is indusrty standard and XLR cables will always run in this fomat.
Also note that some microphones require ‘Phantom Power‘ this is a 48v current supplied to the microphone and is turned on via the mixing desk.
Microphone placement – microphone_techniques_for_recording_english
Parts of microphone (wip)
- Popshields
- Cage etc
