Began to throw ideas around for the Knockabout Malt Room of Mischief. This area is working alongside Knockabout publishing and VIZ comic. There were various sideshow games to be thought of :-
Hook a Duck
Ring Toss
Hopscotch
Buzz wire
Mole Bash
Planning and Design
The plan was to make these stalls look like actual sideshow games but with a twist to make the games harder if not impossible.
The stall we discussed was Ring Toss. We firstly threw ideas around about what could be done to this game to be made tricky.


- Downwards hooks
- Oversized hooks/posts/undersized rings.
- Tipping hooks.
- No hooks – painted on.
- Discs instead of rings.
- Spinning hooks.
- Incomplete rings.
- Weirdly weighted rings – would fly weird.
- Hooks close together to make it hard to get ring on.
- Hard materials to make rings bounce.
- Hanging hooks to make them swing.
- Constantly moving hooks.
- Square rings and pegs.
- Collapsible rings.
- Strobe
- Lighting to cast shadows.
- Different weights of rings – would be hard to get a handle on.
The ones in red were the ideas we thought were worth pursuing. Basically we came up with so may ideas it was hard to whittle them down, we could not incoperate them all into this build. So we chatted about what we liked the best and decided on a couple of different techniques to use for both the hooks and the rings. We thought that the ones we chose would be fairly straight forward to implement given the short time frame for completion. Also as we were just voicing ideas there or some which may not have worked very well in practice. We also wanted to incorporate various different build techniques for the final look so that also informed our decision such as using visible cogs to turn the rotating hooks.
We then started to think about the look of the design.
- Visible cogs to drive turning hooks.
- Old victoriana
- Faded and weathered – a bit tatty.
- Blues, reds and yellows.
Build materials
- Broom handles
- Plywood
- 2×4 timber
- Springs
- Motors
- Paint
- Materials
I have also been researching various design ideas here
Our next session we began hammering out some more ideas and beginning the build. We decided that our back board would just consist of a 8′ x 4′ piece of plywood/chipboard. The target rings would also be made of ply/chipboard. We decided that we would cut the rings out individually and then we could step them out with risers to give the game more depth. With this dimension we then able to start to design the target rings and hooks. Charlie Brown was able to use Autocad Fusion on his computer to aid this design process and in so doing we were able to more realistically view the finished build and then make some aesthetic amendments before any measuring or cutting occurred.

We did encounter various problems fairly quickly
- Lighting – no strobe to be used.
- Backboard size – may not fit in the Maltroom.
- Hook size – aesthetic
- Very flat looking – aesthetic
- Hook mechanisms – rotating, floppy
Taking each of these in turn
- No strobe as warnings and health issues are associated withe the strobe we decided it probably best not to use this form of lighting. We were using it to try and disorientate the ‘punters’ thus making it harder to get the rings on the hooks. As a second plan we have thought the use of a moving gobo will also achieve this result. We are also looking into other lighting ideas to cast confusing shadows onto the target. One final though of lighting is that as we are making each ring of the target stand off from each other we could light it from behind.
- Backboard size -We were informed that the Maltroom celing had a 6′ 6″ clearance we started to design to this size. We then discovered that we shold have more room and a full 8′ x 4′ board should be able to sit in the space. So we will work to this specification, if things do need to be lowered then it should be a relatively easy fix as we could just cut down the backboard and the frontage accordingly. Also for the backboard we wanted this sturdy so thought 18mm plywood would be best for this.
- Hook size – this was discussed from a purely aesthetic stand point, and size hook would probably be function but to sit visually well within the rings we decided to make them larger. Original size was 25mm diameter which we doubled to 50mm diameter. At this stage we also talked about hook length which we thought would be good at around 60mm.
- Very flat looking – as mentioned earlier we quickly decided to have the rings stepped out from one another using risers.
- Hook Mechanisms – given the time a resources available to us, not to mention our actual mechanical skills we decided to make our mechanisms a little more straight forward. As such we decided against the rotating hooks. What would remain were downward facing hooks, hard spacing of hooks, and flappy hooks with the use of springs.
Some of the above may still change at this point as we troubleshoot through the build and recognise other issues or area for improvement as we go.
Build
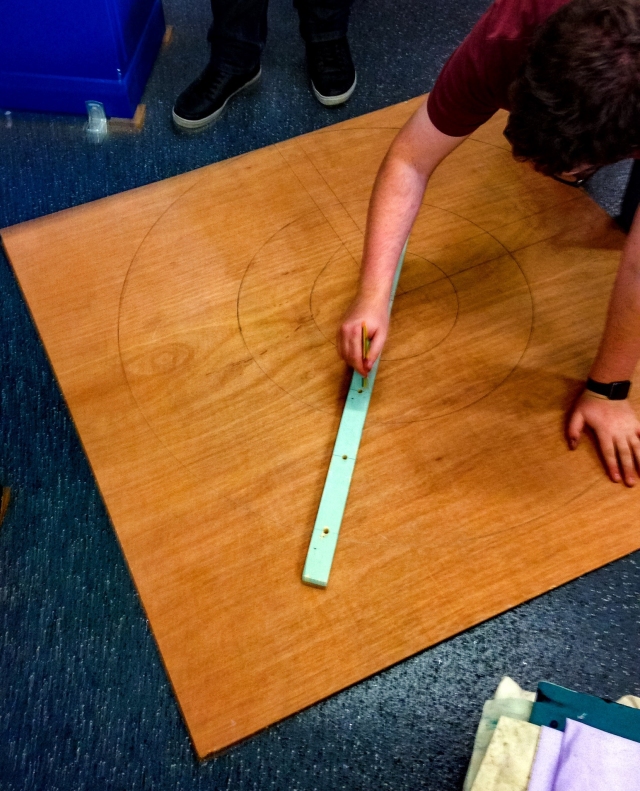
We first started on the rings knowing that the largest diameter we need was 1100mm we sourced a section of plywood from the workshop which would fit our needs. We then had to think of a way to draw a circle the correct diameter.
Firstly we opted for the string and pin method. This method requires that you attach a piece of string to the board at the centre point of your circle. Then measure out the radius along the string and at the desired length attach a pencil. Though sounding simple we had some difficulty in this. Attaching the string so it is stable is one difficulty, depending on your attachment the string may wind round your centre pin. The string was also quite strectchy so the radius could alter. Finally maintaining the correct angle on the pencil again any deviation here would mean that the circle would not complete.
Our second method was much more successful. Here we used a piece of wood and drilled it at the right increments to draw our target circles, we also drilled a small hole for the pivot point. This pivot point was secured in place with a small nail, a pencil could then be easily fitted into the measure holes to draw the desired circles.
The target rings were of the following diameters
- Outer ring – 1100mm
- Middle ring – 850mm
- Centre ring – 500mm
Cutting the rings was quite tricky, we cut them by hand using a jigsaw. the ouer ring was the easiest as we had more play on the outside, which we could then sand down to get this right. The inner rings were trickier. We achieved this by drilling a set of small holes along the diameter of the rings so that we could fit the jigsaw blade in. After cutting we sanded all the rings


We also now needed to cut some 4″ x 2″ into blocks to raise the rings off the back board. This was done on the bandsaw. After first setting the fence to 3″ to ensure all blocks were the same size. Once cut we had a trial fitting and decided that one high for the outer, 2 hight for the middle and three high for the middle target. These were then sanded, glued and clamped.


Once these steps were complete we then proceeded to undercoat them.


By undercoating the rings first we ensured that the colours later applied would be as bright as they could be. Our colour palette was limited to what paint we had available in the art department, but we settled on a red,white and blue palette. We looked for colours which looked faded/old to give the sideshow that old time feel. At this point we also discussed possible distressing of the stall.


As you may notice we needed to mix 2 colours to get the red we were after for he outer ring.


We then started to talk about more deign and hook ideas. We decided that we would have 8 hoks on the outer and middle ring and 4 hooks on the inner ring, this was easily measured out using a rightangle and a 45 degree set square and drawn on the back. We measured to ensure the hooks would be central. We. By this stage we had decided against rotating hooks due to time and budget constraints. We also needed to be realistic about what we would be able to achieve. So now we had a plan it was time to think about the hooks to use. Various ides were thrown around for coat hoks to plungers so we went to a local hardware shop to have a look. At this time we also looked into costing up our backboard.
There were issues with a lot of te option that we had.
- door stopprs were not big enough and were to ostiff to flop.
- Plungers looked good but would be hard to fix.
- Window latches to small and expensive
- Other hooks were expensive or did not really fit the aesthetic.
We decided hat we would go for the PVC pipe, in a previous discussion we had spoken about having a 50mm diameter hook, the pipe available was 40mm so a compromise was made there. This tubing was duly acquitred.
Also upon returning it was suggested hat theree maybe a full sheet of chupboard available at dcollege, so we would not need to purchase any further boarding. Withthat in mind our next step was to build a frame for the backboard, this was a full sheet of chipboard so the frame needed o be 8′ x 4′. This was contructed from lengths we had in the workshop using butt joints.


These joints are a very basic joint and not the strongest. However as we were going to be screwing a solid sheet to the frame it was considered safe. There are other joints that we could have used to give more strength such as mortise and tennon or miter joint. I should note here that the sides of the stall were going to be made of prefabricated theatre flats of the samw dimensions. These we were going to use longditudinally so the throw of the ring would occur 8′ away from the backboard.
We now needed to look at mounting the hooks, and it was dwecided that laser cutting holes of the right diameter directly into the rings would be the easiest solution. Whilst doing this we also cut some smaller discs from some scrap plywood, this would enable us to make end caps and fixtures for our finished hooks. The laser cutte was a little tricky to use as it needed to be calbrated however. We persevered and managed to cut the necessary wholes and extra discs.


At this stage we decided to pint the whooks. they are going to be the same colour as the rings but opposite. This would mean that the hooks would stand out from there respective ring back ground. Once painted however we discovered that the rings didn’t slide as well as on unpainted hooks.

laser cutting the discs from Matt Cooper on Vimeo.
At this stage we also prepared the angled hooks and attached the top caps to the hooks.


We only need to p[ut bases on the hooks which were going to be fixed. Once the glue was dry we then trimmed the hooks on the bandsaw. The floppy hooks just had the end caps placed to allow us to fix the spring mechanism.
We came up with 2 ideas for the spring mechanism one used an axle type arrangement with a block of wood either side of the hook, these would then be fixed to the rings. The other was jst to have one pivot point on the bottom of the hook, and then using wire threaded through the ring the hook would flop at hispoint. The sping in both cases was attached internally to the hook and to the back of the ring through the holes previously cut. As mentioned earlier we had little time to prototype, so this was done on the finished piece. The axle method ensured that the hook would always return to its starting position, bt due to time constraints we ended up going with the simpler attachemnt.


As can be seen the springs were attached via hot glue, not an ideal situation, a better option would.ve ben to in some way atatche bloacks of wood to the rear of the rings and then use a screw to attache the spring. Also to attach the springs to the hooks we could’ve drilled a small hole and then threaded the loop of the spring through that.
Detail of floppy hooks for Ring tossa from Matt Cooper on Vimeo.
We attached the hooks to the middle ring at this point also, as previously stated they had bases attached at an angle and then trimmed on the bandsaw. These were simply attached by using a square of plywood on the back of the ring and screwing directly throught this into the hook base. In hindsight we should’ve also glued these in place.

At this stage we started to think about the frontage. This was basically going to be a similar fram as the back but twith a shelf at 3′ high and a board below this for design and decoration. There was also an awning support made for the top which was going to be covered in fabric
The frame was then undercoated and painted yellow. We should’ve sanded the front board before this as the viyl designs we used at the next step had difficulty sticking to the rough surface. As just mentioned we then started to think about design for the front. We thought about a hand throwing the rings alongside the word ‘Ring Tossa’. We also wanted to put the Knockabout logo onto the centre ring. This is why we hadn’t yet attached the hooks to this ring.
I researcehd various fonts and ideas for the logo design.
When we discussed this we thought the hand idea would be great so I took a photo of my hand then imported it into photoshop to outline it, this was then exported into illustrator to make it into a file that the plotter (vinyl cutter) would recognise.
The final design was this one

So now we needed to send it to the vinyl cutter, as we had painted teh frontage white we thought a royal blue would pop nicely from the background.


The knockabout logo was to be printed in white vinyl.
cutting the logo from Matt Cooper on Vimeo.
Once the vinyl is cut, you need to peel off the unwanted vinyl and the stick another clear sheet over the top. This top sheet peels the vinyl from its backing paper and enables you to transfer it to the final location. When peeling off the unneeded vinyl we reailsed that we had chosen quite a complicated font, this took us some time to remove.
Once the frontage was mocked up it was fely we needed some poles on the front shelp to store the throwing rings. Checking in the bits box we found a spindle which we cut in half and paintedthen screwed to the shelf.

At the stage we also attached the blocks to the backboard and fixed the target rings in place. During this process we rethought our throwing rings and decided to make this cog shaped, the we did with plywood on the laser cutter and stuck multiples together to get the required weight. This were painted black and then rubbed with silver paint.
WE then had the opportunity to visit the Maltroom to decide on location of the games and ti finally get measurements!
It was decided we would go on the stage, this did mean however that we ere now to high for the room. Luckily we had planned for this event and knew it would be fairly simple for us to trim down our front and rear frames. At this point we had not attached our backboard to our rear frame.
We were now nearing completion, the finla parts of the puzzle was to make the fabric awning and sort out our lighting.
For the favric awning we went to a haberdashery to purchase the required material, we cose blue and yellow. This was the ngoing to be cut into strips and sewn together to form the awning. We were then once we had the stall set-up instu going to dress the sides with the remaning yellow fabric.


For the lights we had though about moving heads with a gobo.
Unfortuantely all the moving heads had been booked out or were in need of maintenance. So we though about alternatives, one option was a Solar 250 wheel light with the cog wheel installed.
Solar 250 light with cog wheel from Matt Cooper on Vimeo.
In the end we settled on using birdies which are basically a small PAR lantern.

For colour we used a red and green gel.
As can be seen we attached the bidies using a wooden bracket with a hole allowing a mounting bolt to be threaded through. These lights once in situ were also coverevd in chicken wire to ensure that nothing fell on them as they can get quite warm. The final piece of the puzzle was to have a test mock up, We used black material to enclose it.


WE were now complete and ready to install it in the Maltroom. It was transported via van, and the install went very smoothly. We experienced no problem with this part of the process. The one change we made was to attach cord to the rings, this way they could be easily retrieved from within the stall. This meant that no one needed o be inside the stall to do his. We also during th build had not accomodated for someone to be inside.
We were then ready for opening day!
There was further work involved in setting up the room, building and lighting he other stalls, and the magic photobooth. Creating a gallery for artists work and a curtained area in the gallery for ‘adults only’.
The final role we had to play was producing the lighting for the cabaret. We used fresnels for this using amber, red and blue gels. We lit he stage for solo artists fopcusing mainly on centre of stage. We had 3 lighting states for acts and transitioed between these.


The finla resting place of the Ring Tossa


Pingback: September 16 2016 – Matt Cooper
Pingback: September 16 2016 Construction Workshop ‘Knockabout Maltroom of Mischief’ – Matt Cooper