Overall I thought that the end result was fantastic and we managed to fulfill the brief.
I personally found it to be a steep learning curve as this was a completely different way of working. Previously we had always been led by the director, she told us what kind of lighting she wanted and we would then rig accordingly. For this production it was down to me to design it from top to bottom (I had some previous experience of doing this solo with my special interest project). I did have input from the director but this wasn’t until later on in the process and she just had some ideas for particular parts of the show and a couple of specific states that she wanted (Front Corridor and Central Square). I found the process interesting and rewarding.
As I mentioned in my Researching for the Bee post I looked at various different musicals based in America that were loosely based around schools. From this research I came up with the following points that I wanted to try to incorporate into this production.
- Saturated colours
- Contrasting colours – movement/action
- Complementary colours – softer/gentle
- Lanterns through set
- Lanterns behind set/cyclorama
- Strong face light
- Isolation lights
- Overall warmth to the lighting palette
I also looked at various performances of the musical that we were to produce, from a set design perspective they were following a colour palette used on may other productions, yellow and blue.
As mentioned I wanted the overall look and feel of the show to be warm, with the ability to add cold to specific areas, particularly the goodbyes and Marcy’s song “I speak Six Languages”. the goodbye I used mainly the cold wash but didn’t want it to be too stark, this was after all meant to be an uplifting musical, so brought in a little warm wash and some warmer colours from the parcans.
For ‘I Speak Six Languages” I wanted it to be very stark and cold. Using the cold washes and blue gels helped me to achieve this look, however it did feel quite flat, so I brought in some warm backlight to help lift this section. I feel I could have raised the intensity on these more.

To go back to my research I will take each point in turn.
- Saturated colours
- This I felt was essential when we were looking for a fantasy world, an almost cartoon feeling. I needed to make the colours really pop, looking on the Lee filters website, swatch book and catalogue, I came up with a list of potentials. I could then test these at home on some birdies to see if they worked together and achieved the effects I was wanting. This technique worked really well. The reason I used the catalogue as well as the swatch book is that I only had a numerical swatch book and the catalogue is laid out in chromatic order so similar colours are grouped together, this made it easy for me to compare. What I also found really useful here was the notes that are supplied for possible use of the colours, this really helped me a lot.
- Contrasting colours – movement/action
- This technique I utilised manly in the songs and most noticeably in pandemonium, though the movement was accented with chases.
- https://www.youtube.com/watch?v=5R5ilcNYSNI
- Complementary colours – softer/gentle
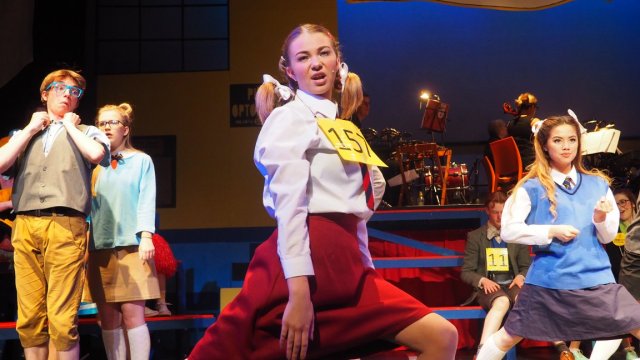
- Again this was used during the songs and dances, I felt this worked very well for Barfees/Olives dance where I used the following colours


This collection of colours looked very nice on set, and really added a romantic mode to the scene.

- Again this was used during the songs and dances, I felt this worked very well for Barfees/Olives dance where I used the following colours
- Lanterns through set
- Though I had planned to use this technique ultimately it was not possible, it was also a guess if it would work, but when the set was erected it pushed further back than planned and as such the lanterns that I had rigged wold not focus through the windows.


Even if this was possible I think the windows were too thin to effectively cast shadow.
- Though I had planned to use this technique ultimately it was not possible, it was also a guess if it would work, but when the set was erected it pushed further back than planned and as such the lanterns that I had rigged wold not focus through the windows.
- Lanterns behind set/cyclorama
- I had not used a cyclorama before so this was all new territory for myself. My original plan had 3 sets of 3 Cyc floods but after consulting the Brewery arts staff they suggested to rig all they had so to give even coverage, this then moved into a 4 x 3 configuration. The other change that was made here was in terms of colour, in my initial colour call I had been too specific with my colours for the cyc and it was suggested that I try to use colour mixing, another technique I had never used, as such the colours on the cyc became red, green and blue
To colour match I needed to do some research and found that there were two types of mixing, additive and subtractive, before finalising my gels I needed to confirm which technique I’d use as this would effect my colour choice. After reading here which I found very helpful.
ADDITIVE COLOR MIXINGYou use additive color mixing when colored lights coming from two or more instruments are combined. This is mostnoticed when lighting a cyc (the white drape at the back of a stage).Blue and red will make a magenta/purple/lavender color, while blue and green will make blueSUBTRACTIVE COLOR MIXINGSubtractive mixing is something you won’t find in paint, only in light. You use subtractive mixing when two or moregels are placed in a single instrument.For instance, suppose you place a yellow gel and a blue gel in a light. The color of the beam of light would be green.So subtractive happens at the lantern by placing 2 or more different gels in front of the source. Additive happens away from the light source and occurs when the sources meet. With this knowledge it was obvious to me that additive was the colour mixing technique we would use. Subtractive uses yellow, magenta and cyan to produce a variety of colours, whereas additive uses the primary colours of red, green and blue.


- I had not used a cyclorama before so this was all new territory for myself. My original plan had 3 sets of 3 Cyc floods but after consulting the Brewery arts staff they suggested to rig all they had so to give even coverage, this then moved into a 4 x 3 configuration. The other change that was made here was in terms of colour, in my initial colour call I had been too specific with my colours for the cyc and it was suggested that I try to use colour mixing, another technique I had never used, as such the colours on the cyc became red, green and blue
- Strong face light
- I failed to deliver in this area, this I think was mainly down to inexperience and so will come in time. It is certainly a very important aspect and in future I think I may end up rigging more face lanterns than necessary. Luckily for this production I know that there were lanterns in the rig that I may be able to utilise if any errors appeared, so even though I lacked face light at cue to cue throughout the rest of the run when I noticed a lack of light I would amend those cue the next day.
- Isolation lights
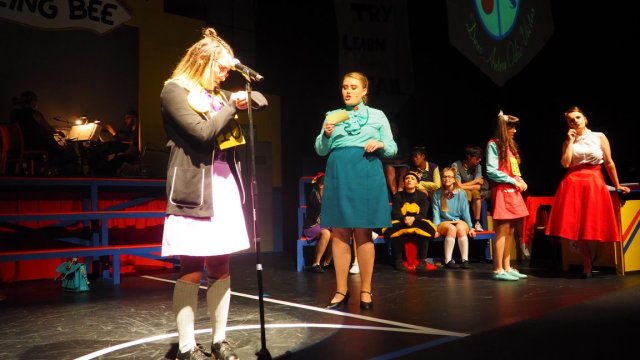
- I used this technique a lot throughout the production, obviously for the actual spelling part of the competition I isolated the speller on the microphone 303, 232 and 1 as well as the judges table 9. During the first act what helped to emphasize this was the use of the moving heads 400, 403, 402 and 401, they swept from the auditorium and upstage corners to draw the attention to the microphone, these then faded to competition lighting of mic spots and judges. (cues 19, 20, 21 page 11)


- I also used this technique when Panch begins to get mad (Cue 220, page 59), I isolated the action on the microphone using 303,232 along with some face light from 211, then when the next cue is triggered 211 is faded out and a red cycolrama and red parcans from LX2 are brought in over a long period. Panch here is building up anger and frustration and gets nearer and nearer the speller during this fade. Hence fading out 211, this really helped to draw the attention to the microphone and give an impression of anger with the use of cyc and parcans behind the action.

- Over all warmth to the lighting palette
- When choosing the gels I always had this in the back of my mind that I wanted the feeling of the production to be warm, as such I tried to choose colours which were on the warmer end of their spectrum. This also worked well for the final production as the set felt quite rich in terms of colour tone.
We experience a few different issues with the moving heads. For one show, the colorspots for some reason failed to change colour so when they were used always produced a red. The next day without changing any settings on the desk or fixtures they worked as planned.
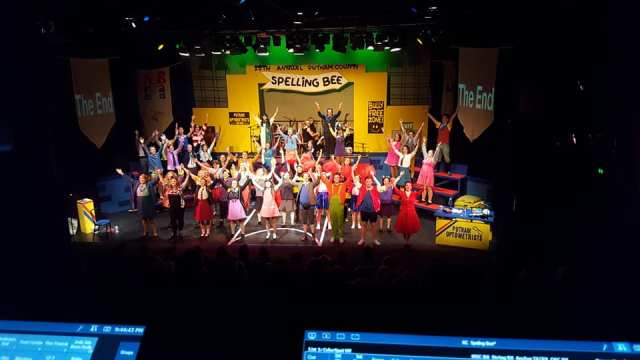
In one of the final cues 251 the winner is announced, for this we had a chase of the rich yellow and orange colours from the generics and the movers were used in a large figure of 8 pattern and their colours set to gold or red. This worked for the first couple of shows and then for some reason they reverted back to white, Before the next show we went to the cues where this happened, 251 being the first and then we recalled this state at 257 and changed the offending fixture back to gold, however oddly this meant that when we used this fixtures in earlier cues that they were now gold. This was particularly obvious in the spelling cues (19,20) This was an unacceptable colour change, so we tried changing them in cues 251 and 257 back to white. Again oddly this replicated the colour throughout our cue stack, but only where the fixtures were used as white, other colour changes were fine. I’m unsure why this was occurring particularly the reverse addition of this colour to previous cues. I’m aware that unless you press the Qonly track button when updating a que then you can replicate a lantern state throughout the rest of the cues.
Mentioning this, it occurred during our show when we added the back light for Marcy’s Song “I speak six languages” This button was not used so these lanterns were then on throughout the rest of the performance (CH#/out/update Cue# through #/update cue only or track.)
Position palettes we should have taken some time to use position palettes for the moving heads, these are much like the direct selects on the desk but are used to position the movers, this could have been done before the cue to cue during the get in. We know that we wanted them to be positioned at the microphone and also on the bleechers. Due to our inexperience we missed this part of setting up, and it would have made the cue to cue a little faster, and may even have kept im my moving sequence for rapid spelling on page 549, which I explain in my planning the bee post.
On a final note about the movers, when we used it for the spelling spot, the movement of them to the microphone could have been faster, ultimately I made the decision that we had higher priority changes to make than this.
Although my script was properly marked, the cue stack within the show file was not labelled correctly (we did start to name them at the beginning of the week). The operator never asked for my script at any point during the show week. Which too was left on site by the desk, so if I was absent for any reason the show could still be called. Admittedly I had not updated my electronic paperwork to reflect any changes, but I think we did have time to update these. But from the desk it is possible to export the show file onto a USB drive, we could then have worked on it during any lunch breaks or at home. We could have made time and come in early just to get this done.
Attending rehearsals was a really valuable experience, it enabled me to get a better uderstanding of the feel of the show, which then fed into my lighting design. It was obviously invaluable in deciding where possible cues might occur and as mentioned I worked on this with a very similar mind to the director so we had changes and similar points as well as similar thoughts about lighting states. This was fantastic news as it meant that I had to do very few major changes to my plans as we got nearer the show.
What I would have found useful is some kind of blocking, I unfortunately failed to get round to this aspect of planning the show. In future I will ask the director/choreographer more about this.
I underestimated how long it would take me to fully write up my cues to pass to the operator for him to build the show file. Overall even though I had extensive notes and script mark-up it still took me around 4 days to finalise it.
hillary cues – working document
LXfree was invaluable to me throughout the design and production process, and though the interface is a little clunky and not the most efficient it did enable me to produce a professional looking document which I could then share easily with anyone involved.


Keeping in contact with The Brewery was great and they were more tha happy to respond to any questions that I may have and offer suggestions in regards to planning. This continued throughout the get in with suggestions on how I may utilise certain lanterns better, particularly the Patt 743 on BR2 and the profiles on BR2.
A note about set from the initial design which I assisted with rendering in 3D 
There were changes made which were not passed down to the team and could have caused me problems with focus, luckily this was not the case but in a more complicated set it could have been a real issue.
- The rear wall became one flat surface with no kick back towards the doorway upstage left.
- The band hole on the decking was extended to 15′ as opposed to the 12′ as originally planned.
As I mentioned in the rig and cue to cue post, this whole piece was also moved back to create more room and the sided bleechers pushed more into the wings. This affected my LX4 bar focus, the cyc lights were now more square onto the cyc, the band top lights were now unable to focus effectively, also the window lanterns were now to be used as rear lighting.
Another issue with the set was that the order for materials was delayed by about 2 weeks. This had the knock on effect that the set was delayed in completion. The plan was to get the set built as quickly as possible and early on in the process members of the team (myself) included had time available which could be devoted to build. As it was delayed this window of opportunity for many hands was missed.
Throughout the build and set design process there felt like there was a breakdown in communication as when the HOD set was absent (sickness) none seemed to know what was happening , which is why I was involved at an early stage. Although we had a shared a drive there was no documentation posted with regards to plans, dimensions possible ideas or final ideas. So it became quite chaotic to figure the set out. I ended up designing the bleechers which were used in the final production, though my initial plan for the main bleecher was changed slightly. This lack of communication continued, hence the issues I had above. It did feel like inadequate measurements were taken when we visited The Brewery so then some measurements became guess work despite the fact that we had received tuition in creating floor plans and measuring up.
I also had to work quite closely with the projection team certainly with a view to not spill light onto any surface that they were going to project onto, this included banners at the front left and right of the stage, the rear wall and the large notice board used for epilogues and the opening scene. The opening scene was a flash back so I used my memory fresnels on LX3 (37 and 38) @100% along with the yellow parcans on BR3 (52 and 53) @ 50% to achieve this goal. This worked quite successfully as the projected image was clear whilst maintaining stage visibility. For the epilogues I used the same state but brought in the moving heads shooting across the stage. So 401 was focused downstage right and 402 was focused downstage left. The beginning of the show demonstrates this.
We also had to work quite closely for a part of the show where we were both cued at the same time. this occurred early on in the script on page 8 (cues 12.5 and 13) we needed to go on cue 12.5 when the projector was cued and our cue call for 13 was when the projection ended. The lighting here was an isolation spot on Panch.
In terms of planning the lighting, it is possible to work out your lighting angles and how much light you will get from each lantern. There are online tools for this, such as the below.
http://www.enlx.co.uk/resources/image-size-throw-distance-beam-angle-calculator
http://www.robinbarton.co.uk/v5/theatre/lighting/beam-angle-calculator.php
http://www.windworksdesign.com/blog/calculating-beam-angles-for-theatre/
And specialised apps such as
http://www.westsidesystems.com/f-pl/f-beam/beam.html
https://downloads.tomsguide.com/Light-Clac-Lite,0301-29996.html
However this step I found very complicated for me to work out for this project and is certainly something I will be looking into improving in the future. This would have enabled me to avoid the errors I made with my focus from BR3 and make changes before focus day. It would also have enabled me to review my face light, though this issue was also due to my choice of gel in the Patt 743, I think if I just had the full stage wash with the gel L137 this would have given me enough of this to bring out the skin tones. If I had kept the rest open and focused as they were I may not have had to bring in the other unused lanterns.
Another aspect that I did not do was working out the power per bar, I have since learnt how to do this as shown in this worksheet
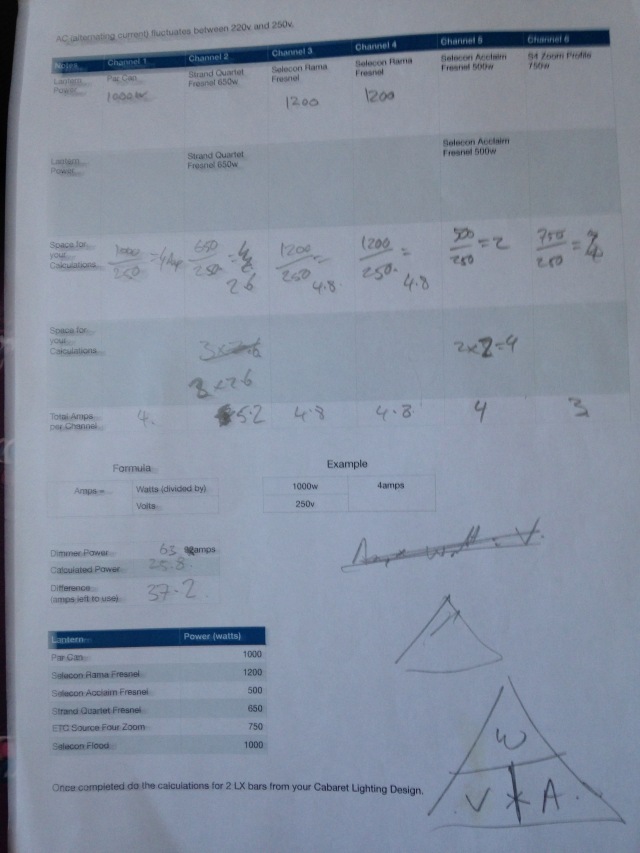

You can see the formula above is amps = watts/volts.
Each dimmer rack will be able to draw a certain number of amps before being overloaded, there may also be a power number per LX bar.
Volts in the UK is around 250
So to use an example of the Starlette 1Kw fresnels
amps = 1000/250
Gives us the result of 4 amps, I would continue to do this for each LX bar and this would give me a total number of Amps drawn by my rig. This number needs to be below what is available.
In conclusion I’m very happy with the outcome of the set and have good reports and opinions about my lighting rig. As mentioned there are things that I would have done differently, but I achieved the look I was going for with use of lanterns and gels. I have learnt a lot from this experience including desk programming, realisation of the amount of work involved, the importance of planning, use of good paperwork and keeping to deadlines.
If we as a lighting team were not as prepared as we were going into the cue to cue I think we may not have been ready to open on the Wednesday night, or at the very best we may have had to miss the dress rehearsal.
At times as a whole, the production team failed to communicate effectively and though weekly meeting were planned these quickly stopped happening. Due to the fact that there was not much change when we had them and departments didn’t have anything new to add. Even though at the early stage there was little extra discussed in these meetings I thought they would be useful to continue throughout the process. It would act as an anchor for everyone knowing that a meeting was happening, and enable jobs to remain on track. It was an opportunity for the HOD to report back to one another and to the project manager on developments, issues and general report of how their particular role was going. I mentioned earlier about the set changes, perhaps with these meetings the changes would have been made apparent and then if my lighting plan needed to change then I would have had time to make these changes.
I also found it hard with my team members being absent, as such I felt as though I was responsible for the lighting plan and I would have liked to discuss this more as a team.
That said however, overall I think we worked very well as a team, again as mentioned I helped a little with set design and also worked alongside the projection team.
