As part of the process of planning I had to apply for my role as LX1 (Head of Lighting) this application was succesful, the full details of which can be found here.
As the Head of Department it was my responsibility to;
- Liaise with director
- Liaise with stage management
- Liaise with the venue (Brewery Arts Centre)
- Liaise with set
- Liaise with Projection
- Manage members of the lighting team
- Plan lighting rig
- Plan lighting cues
- Order Gels
- Create a timetable
Upon receiving my role we had a couple of weeks preparation before we would have out initial meeting with the director. I used this time to review my general preliminary ideas, and to also come up with a scheme of work or timetable for the team to follow and so know where we should be at any given point. I also took this time to begin to create some of the paperwork that would be used both pre and during the production.
The paper work consisted of the following.
Pinterest boards for mood
This board was an evolving board and I used it both in the preliminary research, directors meeting and post meeting once details had been finalised. As we began to finalize the set ideas I added imagery of the various other productions that used similar colours to gain inspiration and ideas on how to effectively use my lanterns.
The paperwork that I produced during this time was
- Hillary Meeting 18-4-18
- This was my initial meeting notes to use with the director. I have spoken about this elsewhere but the main bullet points I took from this meeting were as follows.
- Audience immersion so it feels like they are coming into a gym instead of a theatre
- Actors go into the audience
- Cyc to be used
- Original score (I wondered if they were going to alter the arrangements)
- Colours for each role – the director did not think that this was a viable option for lighting
- Possibly going to be in a fantasy setting this would be confirmed later in the week.
- Some song numbers are dance numbers as well – though specifics to be confirmed
- Each primary speller will have a posse of similarly dressed actors – effectively supporter of that speller. Similarly dressed and similar mannerisms.
- Chip enters via auditorium at beginning.
- Correct and incorrect answers from audience will need to have different lighting states.
- The lighting assistant also took notes from this meeting Lighting.docx
- This was my initial meeting notes to use with the director. I have spoken about this elsewhere but the main bullet points I took from this meeting were as follows.
- Lighting Cue Sheet Spelling Bee Preliminary do not edit
- In this document I started to plan potential groups or lighting states that were needed.
- Preset – audience being seated
General Gym
Memory – flashbacks can be built on
Incorrect – goodbye
Correct – right answer
Competiton – taking part in the Bee
Coneybear trance
Song presets - I thought some of these could be on a submaster (these were not needed when it came to creating the cue stack), we made a note of the necessary cue numbers as we were conducting the cue to cue with the director and used [cue # copy to cue #] on the ETC Gio to replicate these lighting states where necessary. We also used these to give us a base lighting state to build on.
- These states listed were lighting states I felt we would return to through the performance. I’m very pleased I began to think of this at this early stage. I feel it gave me a valuable head start to the planning of the lighting knowing that I needed to have these recurring states so I automatically knew I needed to include them within my lighting plan.
- Preset – audience being seated
- Also in the document I began to formulate a plan for cues throughout the show.

- As you can see in the image above I attempted to colour code these cues,
- yellow denoted a Volunteer
- Blank was a standard cue
- Green was a song
- This system again aided me enormously throughout the process as it made it easy for me at a glance to know what should hopefully be happening next.
- This document holds my initial thoughts and was edited to form Lighting Cue Sheet Spelling Bee after the meeting with the director. She had some blocking for us as to where certain parts may be, for instance Schwarzy’s 2 fathers were to be on stage throughout the performance and would be positioned SR
- Preset – audience being seated stage dark maybe trophy, band
- General Gym
- Central box area
- Front of stage line
- Gay dads – SR near mitch
- Memory – flashbacks can be built on
- Incorrect – goodbye – all bleechers, table and gay dads
- Correct – right answer
- Competiton – taking part in the Bee
- Barfee Competition preset
- Coneybear trance
- Song presets
- Abstract textures
- Window gobos audience
- Pledge – full light/bleechers flag stage right Flag, bleechers, Mitch
- In this document I started to plan potential groups or lighting states that were needed.
- Project Proposal – M. Cooper
- This list what my aims for the project are
- My personal timetable (I managed to remain on track for this despite some set backs which I will speak about later in this post)
- Spelling Bee Lighting Team Timetable
- This was sent to the lighting team at the beginning of the week of the 26th March
- Breaks down what I’m expecting us to achieve each week.
- There were no specific jobs directed at individuals at this stage. I felt as HOD it would be my responsibility to attend rehearsals and find out the various bits of information such as is listed for example,
- 16/4/18
- Find out lead times on Gel ordering
On going desk experience
Chase up info from brewery – Lanterns, type of lantern, gel sizes, theatre layout with dimensions, obtain lighting plot for their desk
- I was aware though as we got nearer to the production date that there would be tasks which would need fulfilling.
- Gel Cut
- Cable Testing
- Gel template making
- Packing
- Lantern tests
- There were no specific jobs directed at individuals at this stage. I felt as HOD it would be my responsibility to attend rehearsals and find out the various bits of information such as is listed for example,
- I should note here that though I suggest in the time table I did not start attending until the beginning of May. This was due to that fact that they were still working on dances and songs at this point, and as such there was a lot of stopping and starting rehearsals as they got these finalised. They continued to work on these throughout further rehearsals as set was built and placed in the performance space but they had the core of these things ironed out by beginning of May. Once May was underway I went to as many rehearsals as possible.
- Blank template for my lighting plot using Lxfree

- Though the above is a straightforward plan template this saved me time when we returned to college after the break.
- Began a trello board
- Trello is a project management/sharing solution available across different platforms.
- Requested to use this via the project management team.
- Ultimately using this solution was unsuccessful, not all team used it, so after the first initial 2 weeks the solution was no longer used. I feel this occurred because we already had many ways of communicating.
- Google drive
- 3 Facebook groups
- Face to face
- Sign up to the group google drive.
- From a lighting perspective this was very useful for sharing paperwork and photos.
- Enabled us to see what the projection team was working on and look to the future lighting plan to help complement the colours used in some of these projections
- Not all departments embraced this, currently no information from (these areas which impacted on us as a lighting department I will speak of later
- Set
- Props
- Marketing
- The use of google drive was incorrect however, as we were all given the log-on details so we were all one user. In reality whoever set the drive up should have invited us all via our college e-mails, this may have made this process easier. This also had the effect that when any of us interacted with the drive the person who had set it up got an unseemly amount of notifications.
Upon return to college the week of the 16th April I already was aware of some things I needed to sort out.
- Meeting with the director (I have briefly mentioned this above) was used to make the updated document Lighting Cue Sheet Spelling Bee. Adding more lighting states.
- Gel lead times (delivery time) and company
- I spoke with our College Technician in regards to this topic. He informed me that we usually place our order for gels with procolor. This company specialises in theatre gels and colour matches theirs to Lee filters.
- Lead time we could pay for next day or it would usually arrive within a week.
- He also sent me an example of a delivery slip

- As can be seen in the image above a sheet of procolor filter costs £2.90 where a similar sized sheet of Lee filters cost £4.33. Procolor are unable to colour match every Lee filter, so where this is not possible they supply a Lee product.
- Looked at creating our own gobos using the laser cutter.
- Unfortunately the laser cutter we have within college is unable to cut metal.
- Our tutor for construction suggested that Acid Etching could be an option though it would unlikely be of the desired resolution.
- The reason for this is that custom gobos cost £57 upwards to create. Custom Gobo
- I was uncertain if we needed custom gobos, but I wanted to pursue the possibility of doing so
- Gobos were then to be sourced from Rosco and the ordered via AC Lighting.
- On going desk experience – unfortunately this did not really happen, our tutor managed to find a morning to help support us with this. Again I will speak in regards to this later in this post.
- We had a site visit to the Brewery arranged for the following week so I needed to think if there were any specific questions we as a team required answers to.
- How many bars.
- What bars are fixed
- Number of channels per bar
- What other lanterns are available
- Confirmation on type of desk
- What each bar may be used for.
- meeting minutes 24 April.docx this also includes the answer to the questions.
- The brewery also asked us to provide a preliminary lightning plan for the 17th May.
- This I amended on my timetable and it also gave me a deadline for actually having something beginning to be planned.
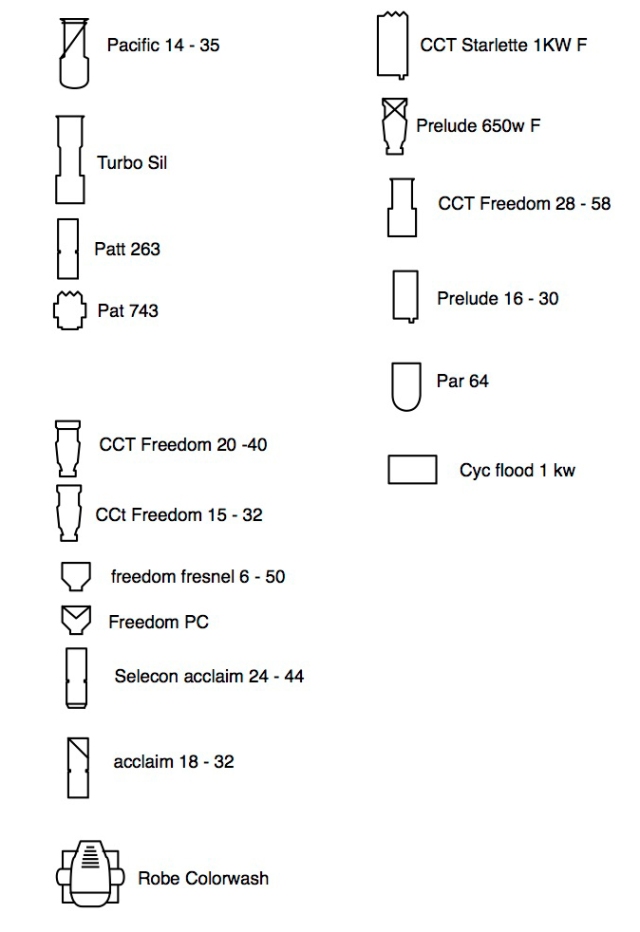
Upon returning from the brewery I reviewed some of my lighting plan paper work as well as researching the lanterns that the Brewery had available, this was mainly to ensure that I know the types of lanterns.
- Parcans
- Profiles
- Freedom 28 – 58
- Acclaim 18 – 32
- Acclaim 24 – 44
- Prelude 16 – 30
- CCT freedom 20 -40
- CCT freedom 15 – 32
- CCT freedom 28 – 58
- Turbosil
- Patt 263
- Pacific 114-35
- Fresnels
- Starlette 1kw F
- Prelude 650w F
- Patt 743
- Freedom Fresnel 6 – 50
- Freedom PC
- Floods
- Othere lanterns that I added from college
- Robe colorspot 250AT
- Robe colorwash 250AT
- The above 2 fixtures are moving head fixtures.
- Selecon Rama Fresnels
I realise that not all the Brewerys fixtures are listed above, I was aware that on Bridge 1, were turbosils, patt 263’s and Pacific 14-35. These I was informed were used as stage washes. As written in my notes from the Brewery visit above, and explained further here. Bridge 2 was also looked at in a simialr way, the bar was fixed and would be used for face lighting, again here I knew that the patt 743 were fresnels and the other lanterns were profiles. As again lanterns on the advance bar. These bars as mentioned were fixed so I couldn’t change the lanterns on them, I could obviously utilise these lanterns as I saw fit however, gels, gobos and focus.
Those not on fixed bars I placed into and numbers sheet so I could keep track of them as I proceeded through the desgin process. I’ve exported this as an excel document but some formatting has gone adrift, as such I will use screen grabs of my original document for explaining purposes. focus and lantern count

Again this was a live document which I endeavoured to up keep throughout the process. The second part to this documemnt I planned to use in regards to focus, gobo, gel and channel.

On this part of the document the red cells are stage right and green bars are stage left. I realise that I have marked it wrong in my document (fortunately I only used this document early on in the development process). I know I had 12 channels per side, thus 24 channels across the entire bar. So I split this document with 12 channels on either side. The advance bar and side booms (shown at the top and bottom) of the image were fixed so this is why they do not extend to 12 channels per half.
I realise that the writing is quite hard to see on the image above as such I will take an individual bar.

So on LX3, Channel 34 would be a Starlette 1Kw fresnel. I then had space below this to add gel, gobo mad focus information. As mentioned earlier I only used this part of the document for a couple of weeks before discarding it.
- Very time consuming updating multiple documents with the same information.
- Correct use and layout of LXfree enable me to get all my information on one visual document
- In this document I was using the Brewery channel numbers. I was advised by my tutor to create my own channel numbers and soft patch (this is where you patch your channel’s via software i.e. within the desk, so though the lantern is physically plugged into dimmer channel 34, we can tell the desk to assign this hard channel 34 to soft channel 1. As an operator we would then only be dealing with our channel numbers once this process is complete.) This is detailed on page 90 of Skip Mort’s book – ‘Stage Lighting The Technicians Guide’

- This is the way that touring companies are able to move from venue to venue easily without having to build their show from scratch at every venue.
Another document I created was a key for Lxfree the software I was going to use for my lighting plan, It was necessary to produce a key so that staff at the Brewery Arts would understand it and also as I was using the free version of the software not all fixtures were available to me, and the software does not allow creation of new fixtures.
As mentioned I did not attend many rehearsals throughout April until mid May. That said, I did attend a couple and made some notes, these were added to this document Lighting Cue Sheet Spelling Bee which I have detailed earlier. I realised my mistake doing this though as I had no back up of the previous cue lists as such during this period I revised a new method for reviewing the script and cues. Again this was utilising pages, which I have exported to an excel sheet for upload. Lighting cues working document. I transferred my initial cues to here and then in subsequent rehearsal visits or amendments I duplicated my last sheet before editing, so edited and renamed the duplicate. I also renamed the duplicate sheet with the date of ammendments.
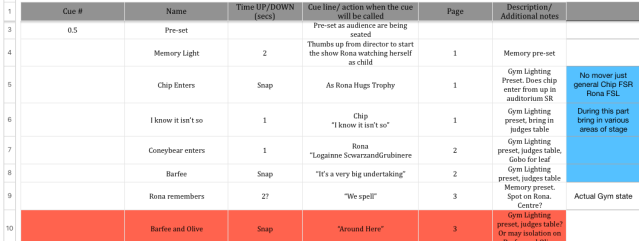
This became my major working document alongside the script for tracking cues. As can be seen in the above image. Each column is used for a particular aspect and each row was a cue. I also realised when creating this that it was at this stage pointless to start numbering my cues as they were sure to change throughout the following months.
So for each cue I had the following information
- Cue # – this was to hold the cue number, in the image above you can see I’ve numbered the first cue 0.5 this is a standard practice in numbering I have seen for presets before the show.
- Name – name of the cue, I usually named them by the line that was spoken where our cue was
- Time UP/Down – fade time for the cue. How long it will take for the lighting state to change.
- Cue line / action when the cue will be called – similar to cue name, except here I explain a little further what may be happening on stage (visual cues) or who is talking
- Page – page number in script for easy script navigation
- Description/additional notes – i used this area as a hint to my self about possible lighting states. These states again I have mentioned earlier but will list my preliminary ones here for convenience.
- Preset – audience being seated stage dark maybe trophy, band
- General Gym
- Central box area
- Front of stage line
- Gay dads – SR near mitch
- Memory – flashbacks can be built on
- Incorrect – goodbye – all bleechers, table and gay dads
- Correct – right answer
- Competiton – taking part in the Bee
- Barfee Competition preset
- Coneybear trance
- Song presets
- Abstract textures
- Window gobos audience
- Pledge – full light/bleechers flag stage right Flag, bleechers, mitch
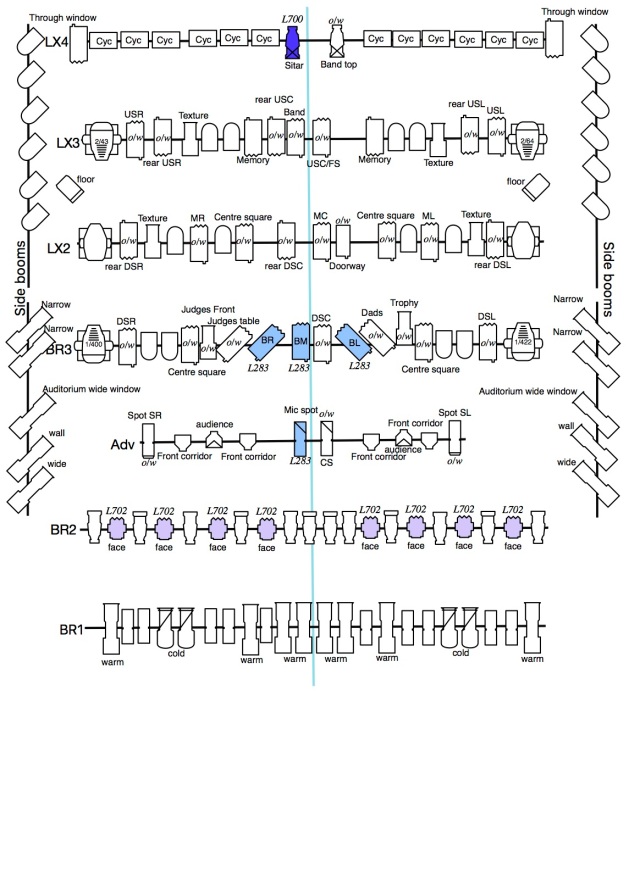
At this time I was also finally able to talk to our director in regards to specific ideas that she had for the production. In the Lighting cues working document I created a duplicate sheet as previously mentioned and named it ‘Hillary Cues’ (Hillary being the director). Upon speaking with Hillary it became evident that we were both thinking along the same lines in terms of how and what should be lit where and when. There were a couple of things that she specifically asked for such as a central box of light (middle of the stage) for this I used 4 1Kw fresnels on LX2 and BR3 and a front corridor (Downstage across whole stage) for this I used freedom fresnels 6 – 50 on the Adv bar to achieve. Any further notes I added to my spreadsheet and script and took these into account accordingly during my planning. Other than the 2 states just mentioned I already thought I had lanterns focused in the necessary areas to achieve what she was asking. The lighting plan will be shown shortly.
As previously mentioned it was during this time that I needed to produce my preliminary lighting plan for The Brewery. During the site visit at The Brewery it was deemed necessary that the large flats making up the rear wall of the set would need to be supported in some way at the top. The solution to this was to use the Hemp bar (scenic bar) which sits between LX3 and LX4. Though not labelled on the following sketch these are the 2 lighting bars situated upstage.

This would obviously effectively remove Lx4 from any contribution to lighting except for Cyc, band down lights and possible light through the side windows (which had not been finalised)
I also needed to bear in mind the size of the decking, and how much this may protrude into the performance space as can be seen here between the yellow/blue flats.

However unfortunately the only scale item we had was the above, the decking though situated was not raised, the desk on the right side of the image again was not raised and was not to scale. This obviously could cause me some issues from a lighting design perspective in not knowing exactly where stage furniture may be positioned. It was also unfortunately at this time that our HOD Set was taken poorly and was not available. This is when I did some work on the set. From this work I managed to create a reasonably accurate 3D render of the space. I say reasonably accurate as it seemed like no one had measured the whole of the space including the wings etc. Though they noted on the Brewery Technical Specifications, I felt it would have been wise to measure as much as we could at the site visit. I should mention that I was not perfect in this regard, I attempted to measure out the distance of the various lighting bars, via paces (i used one pace as 1m), so not an accurate measuring device in the first instance. I forgot to pace out the distance from the upstage wall to the first lighting bar. Also please consider that this sketch states that is approx 1:50 scale.

I managed to create a 3D render of the set to aid in my design process
In an earlier version I attempted to place my lighting bars, this was when I realised my mistake when pacing as detailed above.

As can be seen even with my rough placement of the LX bars the distance between LX4 and the stage flats was very small. Also at this stage the flats were to be 5m from the ground, thus giving me about 50cm clearance if the flats were directly under the lighting bars. At this stage this wasn’t an issue but this would have been in the final get in if they hadn’t reduced the heights of the flats to 4m from the ground. (I will talk about this during the get-in part of this discussion)
Once I had something ‘solid’ to work from I could then produce my preliminary lighting design. I took a top down image of the render and overlaid a grid
the 2 versions shown above are identical except in colour, I used colour to differentiate the different levels and ares of the performance space, but found it too busy when adding my annotations. This system of gridding out the performance space I had used previously particularly in my Special Interest Project. An example of this can be found on page 230 of Skip Mort’s book – ‘Stage Lighting The Technicians Guide’
The various annotations are
- Upstage Right (UR)
- Uspstage Centre (UC)
- Upstage (UL)
- Front stage (FS)
- Bleecher SR (BSR)
- Bleecher Main (BM)
- Bleecher SL (BSL)
- Midstage Right (MR)
- Midstage Centre (MC)
- Midstage Left (ML)
- Downsatge Right (DR)
- Downstage Centre (DC)
- Downstage Left (DL)
These shorthand versions DL, MB were used when creating my lighting plan in an attempt to keep it clear and concise. For my preliminary plan I concentrated on trying to light each of my defined areas as well as ensuring that I had fulfilled the directors wishes with central box and front corridor. As such I came up with the following plan.
Though there are colours shown these were merely placeholders at this stage and likely to change. I decide to use the centre square and front corridor I have previously mentioned. For my gerneral lighting of DR, DC, DL, MR, MC, ML, UR, UC, UR I also used 1 Kw fresnels
Spot lights SR and SL were to come from the advance bar (adv) which was unable to be changed, as such the Selecon Acclaim 24 – 44 were used for these.
Microphone spot, though not mentioned on my focus diagram was downstage centre. For this I used one of the acclaim 18 – 32 again on the advance bar
The bleechers and the band were to be front lit again via Starlette 1Kw fresenels as were rear memory lights.
To light the doorway I used a prelude 16 – 30 which was to be shuttered tighty on the door.
The Starlette 1Kw which is red and labelled panch was to be used in a particular scene to add anger.
Though not thinking too much about colour at this stage, i was thinking about texture hence the four prelude 16 – 30 labelled texture. These were to have gobos softly focused. My initial thoughts were to use these during the dance numbers
CCT Freedom 28 – 58 were to be used as spotlights on the judges table and trophy again shuttered off accordingly.
Lastly, on the rear bar LX4 i positioned 9 cyc floods, 2 1Kw fresnels to shine through windows and 2 prelude 650w F as down lights on the band. I had 1 purple on here as during the show we are transported to a fantasy India. As mentioned however, these gels are just place holders at this stage.
An additional note on the window fresnel, from my research here I really like the idea of using lights behind set pieces to cast shadows and texture onto the set, so even though the design for the windows was not finalised and I had no way of testing them, I placed these lights with a view to testing them on site, and if they didn’t work to just not use them.
The images that particularly stood out to me from this research were those from Matilda


In reality these lanterns were not used the windows were too thin

During the get in the entire set got moved further back than planned so we were unable to focus these lanterns through the windows. They were then focused as rear light on MS to DS with L770 used.
Once I had produced this preliminary plan I created a document to e-mail to the Brewery Art Technical Department.
Preliminary lighting to brewery
Within this document I also asked some more questions that had arisen.
- Do we need to supply dmx cables? We needed to be able to control and patch the moving heads
- Lanterns on BR1 are they all paired? If not I thought I would have the possibility of using these as extra spot lights if required
- Profiles on BR2 can these be used as spotlights? Again as previous question really
- I do not know the profile lantern types on your side booms could you please give me this information?
- Are your house lights controllable from the lighting desk? We’re looking at trying to make the whole auditorium feel like a school gym and at times I will need to bring up some light on the audience
- I also asked about the possibility of side booms in the wings, as there were dance numbers added to the show I wanted to put into practice further knowledge gained through my 2 years. Side Booms.
To which I received the following response
Hi Matt,
This looks like a good start. Just a few this I have spotted.
How many colours are you having on the cyc? You might what to add the other 3 we have to help with even coverage.
The lights on B1 are paired the show file I sent to you will show how they are paired.
B2 Profiles – you can use them as spots
The side booms are turbo sil’s to 2 are 11-26 and the bottom 3 are 15-32.
House light are on a separate 6 way Lx board
Last thing is I see you have said you might want booms on stage if you can bring the stuff you want (i.e. Lights, Scaf and Tank trap’s) we can proved 15a cable to them if you needed
If you have any other question just shout up.
Thanks,
Niall
So good news and bad news, firstly Niall offered advice on my use of the Cyc and suggested I used 4 banks of 3. This advice I took on board and feel it really showed in the final production, again more on this later.
B1 are all paired so I’d be unable to use them as spotlights.
B2 however is a different story and these would be available for this.
With the side booms I was at this time thinking of shooting across the space to the opposite walls, so would use the widest 15 – 32 for this. Unfortunately, when we came to focus I had placed a gobo one on each side of a window, I wanted this gobo to be a 90 degrees to it’s suggested use, these turbosils however did not have a rotating barrel so made getting the position a little trickier than normal.
Side booms we needed to supply our own solution except power. Again at this preliminary stage this wasn’t definite but I was asking questions to ensure we could deliver if necessary.
I also asked at this time about gobo size as different lanterns take different gobos thegobo.com has a great table showing this. The lanterns at college all take size B gobos so my thought was that if The Brewery used a different size we would need to take our own lanterns. I thought this as a use consideration, we have a tight budget at college and to spend money on gobos which could only be used at The Brewery would be a false economy. So I may have had to look at different solutions. Fortunately The Brewery lanterns can take both size A and B sized gobos.
After this my only further question for The Brewery was in regard to BR2 Patt 743 I didn’t know how much coverage they may produce, Niall suggested that 2 would get an even coverage across the stage. However I was going to use these as a face light with a Lavender gel L137 which can be used in conjunction with your stage washes to bring out skin tones.
From here I continued to attend as many rehearsals as I could, marking and remarking my script and amending my cue document daily.
I also filmed as many rehearsals as I could attend and then uploaded them to Vimeo and shared them with both the actors and the technicians.
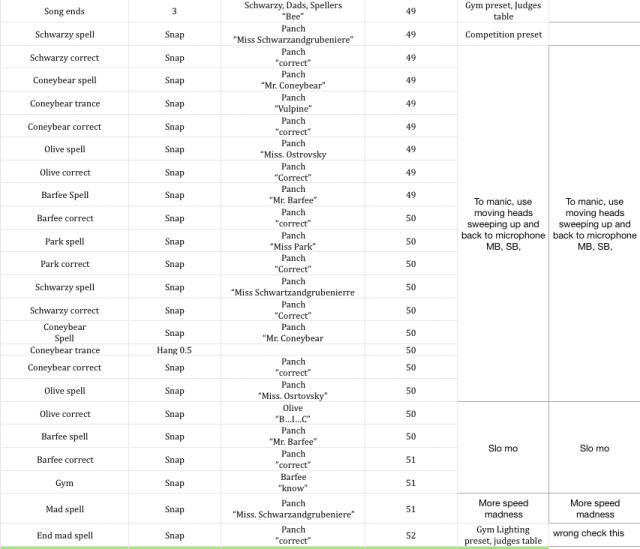
My script was also a working document as such I marked it with pencil and post-it slips. Unfortunately as I’ve worked on the production most of my notes have been erased and post-its moved as I got nearer and nearer showtime so I have little evidence of this method of working, there is some evidence left on a couple of pages however.
In the 2 images above you can see notes on the 17/5 and the 24/5. They are both associated with the same part of the performance on page 49 ‘A Spelling Montage’. For this section the spellers are moving very quickly from the main bleecher to the microphone and back again and the whole feel of this section was hectic and chaotic. I wanted to add to this with the use of our moving lights. As mentioned in the note dated the 17/5. The note on the 24/5 is on the opposite blank page of the script and is a diagram attempting to show the movement i wanted to achieve.
This is then replicated in my Lighting cues working document on the sheet dated 18/5 with the following
Some of these hand written notes were just blocking notes nad may or may not have effected the lighting such as

Noted marked 24/5 Walks in circle though this is not marked on my cue document as I decided there was no need for extra lighting for this.
Again i found this method of working very useful and efficient, and I will just begin in this way in the future without producing a document such as Lighting Cue Sheet Spelling Bee. At the end of rehearsals I may speak with the actors or director depending on if I thought i needed to or not. An example of this is when I spoke to the director in terms of actor placement, within the song ‘I Love You’ Olives dad was coming on stage from 3 different areas (all were SL) but this made it quite difficult for me to mark out in my script and cue document. The director was unsure how this movement would occur, and would decide this in the venue, as such during cue to cue this actor was still not lit and we needed to add a cue later in the run to ensure we lit him adequately.
My preliminary plan was not to use moving lights at all, obviously after the meeting with the director it became obvious that we would need them, as such during rehearsals I started to think how we may use them effectively, in the final lighting plan I used 4 robe colorwashes and 2 robe colorspots. Utilised at various different parts of the show but most notably during Coneybears spelling and the actual spelling competition when a speller was called and also during.
During Coneybears spelling he goes into a trance so from our common competition lighting detailed below we focused the colorspot 250at from LX2 behind him at the microphone, with a gobo selected, when he went into his trance we snapped to these gobos with a rotate, once he spelled we snapped back to competition, an example of this can be found on page 13


- Cue 26 Coneybear is in a spotlight and the color spots have moved to position and selected colour and gobo.
- Cue 27 Coneybear goes to trance, colorspots full intensity and gobos rotate
- Cue 28 return to competition spot light
I’m aware that in most of my images of our lighting desk cue stack there are many cues misnamed, to the right of the image (in the cue stack above Cue 29 “Song End…) should be Gym lighting, likewise “Scwartzy spell should be Coneybear spell. These are misnamed as they were copied from a previous cue to ensure consistency in common lighting states throughout the production, however due to the amount of cues and time allowed the lighting operator didn’t have time to name them. Even after our cue to cue when we had a show we were only allowed into the theatre an hour before showtime, as such making tweaks and changes were prioritised over the naming of the cues. I suppose it would have been possible for the operator to take the show file home and rename it that way.
When a participant was called to the microphone we had my general gym lighting state in place, the participant would approach the mike and the actress playing Rona would usually have a joke about the participant, once this joke had ‘landed’, that would be my cue for the lighting to change to competition lighting which consisted of 3 cues, 2 of which were follows such as on page 18 of the script.

I should note that though it cannot be seen in cue 53 the moving heads were put into position and there colour and focus set.. This was the 4 colorwashes, set to white and narrow beam. These were positioned in the four corners of the auditorium, the two on LX3 were focused on the stage flats SL and SR respectively, the 2 on BR3 were focused into the auditorium against the back wall again Right and Left respectively.
I was trying to replicate a feeling of quiz shows such as ‘Who Wants to be a Millionaire’ and ‘Mastermind’
So when cue 54 was triggered the lights would turn on, move, and then fade out to the microphone spot lights channels 303 and 232.
To break each cue down
54 – intensity up
55 – Move
56 – fade to comp spot
This looked like the following on the show file on the lighting desk

In hindsight after watching the show, the movement cue should have been a lot faster, unfortunately during the run we did not have time to alter this cue as there were many of them and we had other cues to alter which I thought were more essential. Whilst on the subject of the spelling cues however, in the second act we decided to remove the moving heads from any of the spelling competition, we instead jumped/faded straight to the competition spot lights from BR2, this allowed the performance to flow a lot more. It was fine in the first half due to rhythm and timing being a bit haphazard due to the volunteers, we did remove it a couple of times in the first half most notably after Coneybear shows Mitch his homemade clothes and then goes straight into spelling on page 27.
Also whilst on the subject of spelling the first half was quite complicated in terms of cues, due to the audience volunteers, though some words were ‘rigged’ hard or easy in an attempt to bend the show to our will there was always the possibility that the volunteer would get the word correct or incorrect, as such we needed to have 2 potential lighting states from a volunteer spell. This in fact when we came to cue to cue became 3 cues.
- Incorrect
- Incorrect to seat
- Correct
This cue stack can be seen here from page 17

From the desk

So cues 44,45,46 are our standard moving light to competition spot. After this the volunteer is asked to spell. If they were correct we would need to [goto cue 48] general gym, or if incorrect [go] on next cue 47, the goodbye lighting state for the song, when the song ends we would then [go] on 47.1 which brought in the auditorium lighting for them to sit, once sat we would then [go] on 48 to revert back to gym. At one point during one of the shows the volunteer took longer than we thought to return to their seat, we could tell this was happening so we prepared another [goto], this enabled us to get back to the correct cue timings.
Since producing the show I have contacted ETC to ask if there were other ways of doing this.
Hi Matt,
I hope you are well, We have a couple of suggestions for this:
1) The use of Marcos, you can construct a series of Marcos linked to direct selects. Which would enable you to jump from cue stack to cue stack.
2) Or just typing out the cue stack that you wish to jump to. (this would enable you to jump to a cue within a cue stack.)
Many Thanks
Chris Purnell
Field Service Engineer
ETC LTD
A note of explanation the Gio desk can have multiple cue stacks, though I’m unsure how to do this, Chris is suggesting depending on the outcome we would jump to a different stack, he suggests 2 ways of doing this.
Via a macro – a macro is essentially multiple commands linked to one button. The technicians at The Brewery made us a macro for lamping on and off our movers as this is buried in a couple of menus.

Chris also suggests an alternative method would be to type in the cue stack we wished to jump to.
In all honesty from the skill level myself and the operator were at in regards to desk control I feel we came up with the correct solution for ourselves. I think the possibility of getting confused about cue stacks would be even greater than the [goto] option we chose. This also had the ability that if we got it wrong we were still in our original cue stack so could easily recover.
In my image of the script
You can see on the left that IO made a note of the goto cue, I did this for each part where this was necessary. We also ensure that our cue stack was laid out the same for each volunteer. admittedly it wasn’t always a #.1 cue for seating but the order of cues remained the same incorrect, seating, correct. This I felt was a wise decision as it made it clear once we were in the rhythm of the show what was occurring.
Whilst on the subject of volunteers I should note the cast attempted to wrangle them in particular ways, in the image above you can see my note that the answer should be wrong (though as mentioned they are real words being used so there was a possibility of correct). Also depending on how many volunteers were left at a given time would mean that parts of the script were either skipped or used. e.g page 30

So if we got to cue 100 and there were two or three volunteers remaining then we would skip to cue 106. If there were still four volunteers then we would proceed with cue 101 (this did not happen in our run, but as mentioned was a possibility).
Unfortunately, during the run up to the show the Year 1 assistant was never attending college, and the year 2 LX2 (operator) was also absent. This had the effect that some of the jobs that I was going to ask them to undertake were left to myself. These tasks were
- Testing moving heads
- Prepare the moving heads
- Gather cables and test
- DMX
- 13 amp extensions
- Acquire and test 2 Selecom Rama fresnels with wooden floor stands
- spare bulbs for these lanterns also needed.
- Test ideas for the movers – spelling competition movement. Rapid spelling
I also produced a job list at this time to ensure things were not being missed, again this was a working document which i ticked off as jobs were complete, that said the comments made in red are comments I’ve added for the purpose of the blog.
Jobs List – 30/5/18
Complete lighting plan for brewery 1st June – Done
Colour gel order 4th June – Done
Gobo order 4th June – Done
Test Cables – done 4 June
Channel numbers 4th June
5th June
group list, palettes, magic sheet – Slightly delayed due to the time it took me to complete my cue list.
Cue stack (Blind) – This was only able to be completed by LX 2 once I had completed my cue document, as mentioned later this took me longer than anticipated, so when I had completed act 1 I sent him those cues to work on. I had also sent him my completed plan without gel colours so he could build his magic sheet. We did successfully manage to deliver this aspect on time however despite not quite adhering to our original timetable
Gel cut and labelled in order SR – SL – Again this was delayed and the gels did not arrive until Friday 8th June. This being said I did manage to cut the majority of gels before the get-in.
Find folders for cut gels – I used plastic A4 wallets for this, I placed gels in order SR- SL, labelled and also labelled the wallet by LX bar.

Clean Gauze – This was undertaken by stage management. When opening out the gauze it was found to have some water marks and a coffee stain. These were mostly successfully removed and were not visible during the show. Also there were numerous holes in the gauze, again our Technician came to our aid here and patched these.
Focus notes – These were on my final plan sent to the venue on the 1st June
Mover check
Final Mark of script (except songs) as best I can – as mentioned this took me longer than anticipated though was completed
Testing the moving heads
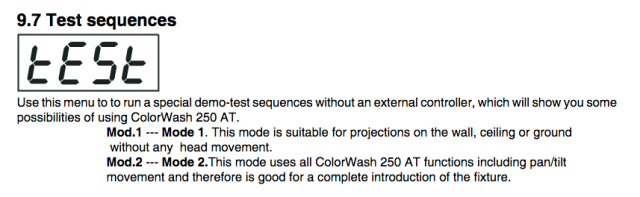
To test the moving heads I followed the instructions as per manual
Found on page 24 of the manual.

I ran mode 2 on the fixtures to ensure that all functions were working. Unfortunately on one of these fixtures the test sequence would not work. I labelled this fixture as such and notified our college technician. When he subsequently tested and serviced the unit he was unable to get it to work. Luckily we had a spare newer unit available, so he swapped out the gobos and colour wheels from the ‘broken’ unit into the newer model and then ensured that the settings were correct so that the 2 units we had produced the same effects and colours.
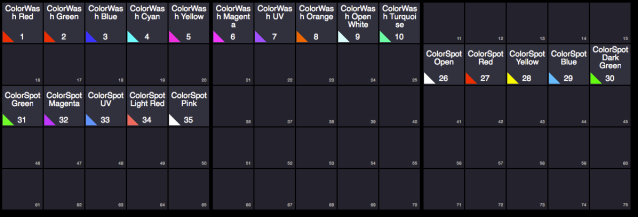
Whilst on the subject of these I should note that only the spots had access to gobos, hence my decision to use them in the Coneybear trance scene. The drawback of these units is that they are limited in colours by their colour wheel so there is no precise control over colour just intensity (11 colours). You also cannot focus these units.
Control for these units via the desk shown below


Again the test sequence mode 2 was used found on page 24 of the manual.
Upon powering up one of these units it was also to be found faulty. It was making some grinding noises and moving erratically. Again this was labelled and then serviced by our technician. He later informed me
The ball bearings in the gobos were dry as a bit and needed some lube. There is a problem with “Gobo indexing” which is a sensor which works on magnets to know when the wheel has gone round and when to stop. It’s only really an issue if you had them on sound to light mode. But because they were being used in a controlled way the fault wasn’t a major issue
Control for these units via the desk shown below


As mentioned at this stage I also set the DMX channels on these units, it was important to do this whilst on the floor and testing to ensure we had control of the units and also to readdress the DMX once they were rigged in the brewery would require using the tallescope, which once the set was in would be quite difficult. I also ensured that they were all in the correct mode, for both colorwash and colorspot this was mode 3 to give as much control as possible, this was also necessary to use when working out DMX channels so I knew how many channels each fixture was using. Colorspots in this mode use 20 channels and colorwashes also use 20.
Once they were assigned channels I also assigned them in pairs to LX bars, this was noted on the unit also. So on the unit I labelled, DMX address, LX bar, and channel number. I gave them a high channel number starting at 400 as can be seen here
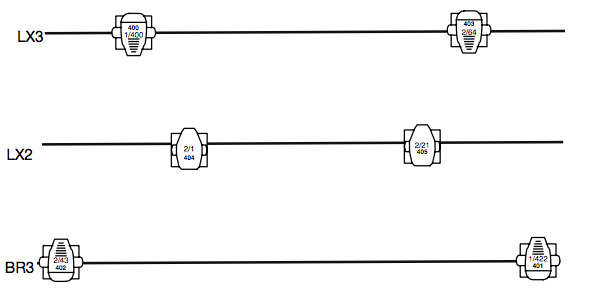
So LX3 and BR3 have colorwashes, LX2 have colorspots.
Washes
- Channel 400 – DMX 1/400 (1 is universe and 400 is the address) This mover was the one
- Channel 403 – DMX 2/64
- Channel 402 – DMX 2/43 (2 is second universe)
- channel 401 – DMX – 1/422
Spots
- Channel 404 – DMX 2/1
- Channel 405 – DMX 2/21
They were packed via LX bar and the flightcases were also marked.
When patched the patch window of the lighting desk was as follows

Below is a video of me testing the Colorwash fixtures, you can see later on on the video where one of the units is not moving. This is the fixture which was repaired by our technician.
Whilst testing I also tried to emulate the sequences that I was wanting to achieve within the show, for the fast spelling this involved 2 moving heads.
They would be positioned, 1 at the microphone (A) and one on the bleechers (B), this would be their position which they would be in in preparation of the speedy spelling on page 49.
- A @ 0% B @ 100%
- A move to bleecher, B move to microphone
- A @ 100% B @ 0%
- A move to microphone B move to bleecher
Repeat from step 1
Testing within the box worked well, however when it came to doing this within the Brewery we simply did not have time to programme this, as such these cues got removed

For this sequence we just use our standard competition spotlight, and when the action went into slow motion we introduced the bleechers with a 2sec fade as the ensemble were adding to this feeling, the following cue the spelling becomes more manic, so we went back to the competition spotlight but added the central box with a chase effect.

The actors on stage begin to run around in circles so I used my central box fresnels in sequence to replicate this motion. (the number 19 to the right of the image below)


I have gone a little off course here, so to go back to my initial points I was speaking about preparation work before the production.
Cable Testing
Gathering cables was a straightforward exercise, and just involved searching around our various performance/production spaces for the required cables both DMX and 13amp extensions. I only gathered 10 13 amp extensions as that was all that I required, in the end however these extensions and the DMX cables were provided by the Brewery Arts Centre. I tested all the DMX with a cable tester.
After plugging in the cable, though the unit does state it’s xlr it is fine for testing DMX cables as well you turn the dial to #1 (pin 1) both lights should illuminate as shown, continue to turn the dial to check all the pins. DMX can be 3 or 5 pin. These tests were successful. another method of testing cables it to use a multimeter and set it to continuity you then place a probe on each corresponding pin, you should hear a beep if there is continuity (successful test in this case)
Selecon Rama Fresnels
This was a simple matter of gathering two units, ensuring that they had barn doors and gel frames and then plugging them into our dimmer rack to ensure they were operational. 2 spare lamps were located and packed as were 2 wooden floor stands and mounting bolts.
These were then packed into our plastic orange moving boxes and labelled, below are images of the labelled boxes, I should note that at a later date spare gel sheets and pre cut gels were placed in box LX1
This completed the packing and testing.
Myself and LX2 at his point had a quick morning lesson on using the lighting desk, trying to cover the points that we may need to produce the show.
This was very useful and the show operator utilised many of these learnings for the production.


He operated the desk during the cue to cue using direct selects where possible, this meant that though the cue to cue was time consuming we conducted it in the most efficient way that we could.
Though my cue list was not complete I had been working on my lighting plan throughout this whole process and the various iterations are shown below. Also when I sent my final plan to The Brewery I explained what had changed. Again throughout this planning process I reflected on past shows that I had been involved in and positioning of lanterns.


As can be seen my initial plan changed very little as I had to ensure that I could light all areas effectively from the onset. My e-mail to The Brewery read as follows;
I’ve attached my final plan, there are no gels as yet and some focus may change/be added. As I’m sure you remember Hilary tends to change some layout of show and blocking once in the space. I feel it’ll probably be adding spots which I think will be from BR2.From last time you saw it I think I’ve added the 2 Robe spots, the 2 Selecon Rama floor, and then updated the 4 source four’s I was using on LX3 and LX2 for texture to more freedom 18 – 58.
I had not at this point used and of the profiles on BR2, during focus, cue to cue and the actual show, notes were made on my cues and these lights were added throughout. I will speak more of this when writing about the show later. But below is shown my final plan, as you can see a lot more lights were added with focus.

I was now ready to think about the gel colours for the show. Using the research I’d already conducted
Looking at other musical shows based in schools they use
- Saturated colours
- Contrasting colours – movement/action
- Complementary colours – sofdter/gentle
- Lanterns through set
- Lanterns behind set/cyclorama
- Strong face light
- Isolation lights
- Overall warmth to the lighting palette
All these things I wanted to try and incorporate into my plan and felt that my initial plan had these covered so it was now just down to gel choices.
For potential testing purposes during the half term Easter break using 2 swatch books I had created gels of each colour that would fit into birdies (par 16)

When deciding on colours, I extensively used the Lee catalogue and then referred to the swatch book. Obviously throughout the process I had been thinking about possible colours. and when I came across a colour I liked or thought useful I would add it to a pile of possibilities and then test it in my simple home rig of DMX dimmer and 2 birdies (par 16)


You can see on the middle image that I marked the catalogue with a post-it as reference. This enabled me to later quickly compare gels in the home rig. Unfortunately I did not make extensive notes throughout this process so my evidence is a little shy here. This also could have affected me detrimentally if at a later date I could not remember a particular gel or colour combination which I wanted to revisit.
Though I had not written focus notes on the parcans at this stage I knew that I was wanting them to shoot across the stage parallel to the bar that they were on in the hope that they would create some body sculpting as there was no space in the wings for side booms, my 1 solution to this issue was to situate the 2 selecon rama freesnels under each of the side bleechers to shoot out and catch the performers. I wanted to use a technique I had seen used in ‘The Troth‘ where they used side lights to create shadows on the auditorium walls to add depth and movement to a dance piece, I particularly wanted to use this technique during the song ‘Pandemonium’ which was choreographed to be quite chaotic. Unfortunately when it came to rigging the director did not like the look of being able to see the lanterns under the bleechers so these were removed. The side Par Booms were to be focused again shooting across the stage, capturing downstage and as much mid stage as possible.

For the warm and cold washes I utilised Brents advice he gave me for my Special Interest Project to use slightly different colours in the wash to give subtle change in hue to alleviate flatness. I chose


As can be seen in my final plan I had changed the cold wash from Pacific 14-35 to the Patt 263, when I have used cold washes before I have always had difficulty in trying to get a feeling of depth and not flattening the performance, I hoped that with the use of more lanterns and different gels i could solve this issue. Sadly in reality this was not the case and it still felt flat, I tried to compensate for this with the addition of more rear light and down light (these are the Starlette fresnels labelled USR, USC/FS, USL, MR, MC, ML, DSR, DCS and DSL), which began as it often does to wash out the stage colour. I feel I did manage to come to a compromise of the 2 and the final result in the show, although not exactly how I wanted it, was a successto me though not exactly how I wanted it was a success.
My addition to these washes was a wash from BR2 where I used the technique from Buckets, where I used a lavender wash to compliment the main wash. This has the effect of pulling out skin tones. Remembering that this was set in a fantasy world I wanted to make colours ‘pop’ as much as I could.
I originally chose L702 but when tested was not achieving the effect I required it was too cold. Some further reading led me to L137

This colour worked very well.
I also researched in regards to complementary and contrasting colour at this time, on top of the research I had done previously
During this research I realised that my use of language was erroneous. I had always thought that contrasting colours were those opposite each other, though this is the case in terms of colour these are referred to as complimentary
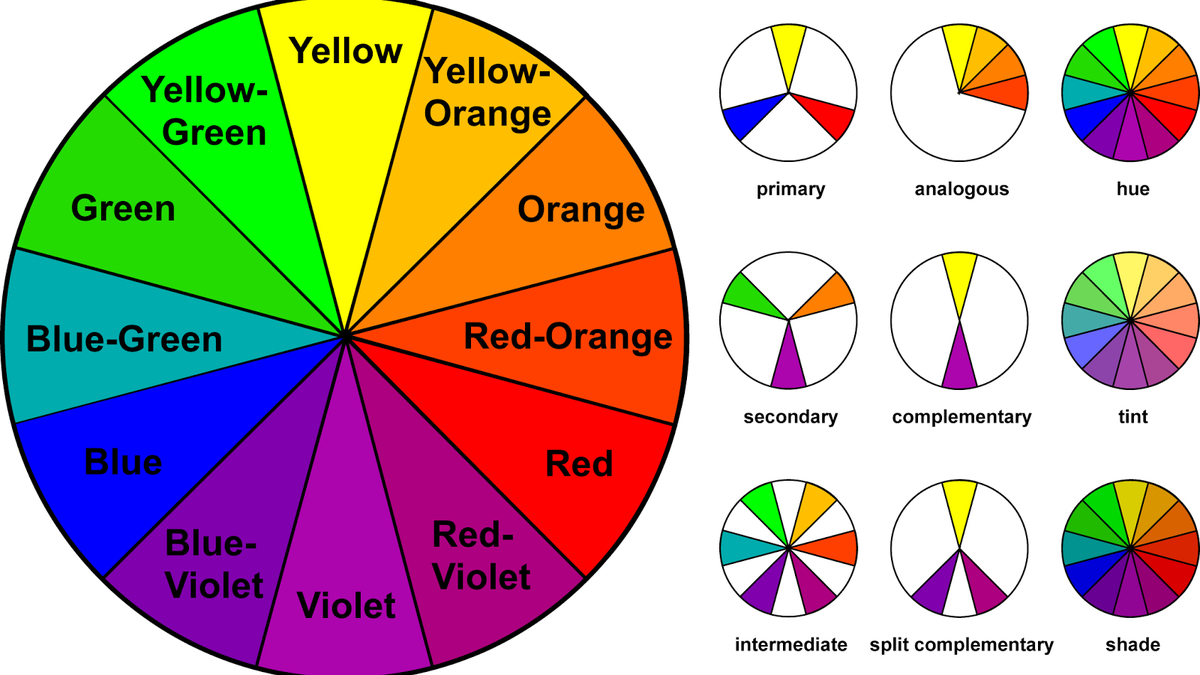
I also found this site particularly useful in helping me understand the language and concept of colour choice
The Ultimate Color Combinations Cheat Sheet
So from this site what I was calling contrasting is complimentary, as shown below.

and below is what I was terming as complimentary.

These 2 effects I thought were quite possible with my decision to use primary colours.
With this knowledge I then began to look through the gel resources mentioned to find gel numbers
Primary parcan colours
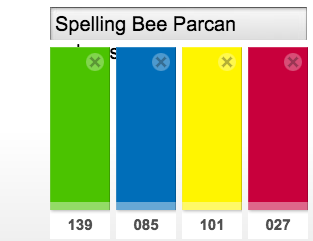
So i had a Green, Blue, Yellow, and Red. As these were not all primary colours, Lee filters offer a Primary Red (L106) and a Primary Green (La139) named filter and you can see that I did choose the primary green. For the red I decided upon the 027 as it was a warmer red and its suggested use is for
Good for cyclorama lighting, side lighting and footlights. Also good for colour mixing.
At this stage I hadn’t assigned it to the Cyclorama, but was utilising it in the Parcans focused as stated above. It was also likely that there would be multiple colours on stage at any one time, so good for colour mixing. I felt it may be of great use. (In reality I did no colour mixing on stage but we certainly did on the cyclorama) In my final draft these colours are changed slightly, The blue and red that I chose to me felt a bit on the warmer side, and as previously noted the setting was fantasy world so I wanted the colours to mostly ‘pop’ and appear vivid. The warm tones in these gel colours I thought would work very well.
Also on the stage parcans I added an orange, again this was mainly to give me more options and to try not to replicate colours, trying to continue the feeling of warmth throughout the set, with this in mind I chose L015, I also chose this colour as during Olives song “The I Love You Song” there were to be actors with tea lights on stage, I thought this would complement this imagery. Again during the final cue to cue these lanterns weren’t used as they were producing too much light and washing out the projections.

The colours that got changed here were yellow L101 – this was changed L767 – Oklahoma Yellow at the suggestion from my tutor. We were speaking about my choice of colours and I explained that I was wanting the warmer end of the spectrum on my hues, to accent the colour of the set and costumes, the costumes were again in bright vibrant colours and choosing this end of the spectrum I hoped would accentuate this further.
We kept the red for this reason, the blue also got hanged but this occurred at ordering, 085 though listed as Hight Temperature was no longer available so I substituted it for HT 120, this was used throughout any lanterns which were blue.
For the starlette 1kw focused on the bleechers and my original microphone spotlight I choose to have a cold gel, this was in fact a colour correction gel L283.

The reason this was chosen was I risked making everything flat, this light on the bleechers worked very well for this separation though the lanterns used lacked a little power, so more face light was added during cue to cue and production week.
To briefly return to ‘The I love You Song’ Olive in this scene is living out a fantasy where her mother is in India. To this end, on top of my other colour choices I choose to use L700

in 2 of the side boom profiles, these were focused across the stage, and in the prelude 650w which was to be used as a downlight on the band. As mentioned with the orange parcans I was trying to have sympathetic lighting here with the projections. videos 24, 25, and 26 in the playlist below.
Near the end of the production Barfee and Olive begin to have a romantic interlude with a pseudo ballet dance, and interactions as they grow closer. This was where I was to use the pink L128 and turquoise L131 in the remaining parcans. These worked very well together to produce a nice effect across the stage.


You will notice that my Memory fresnles also have L85, these were to be used as rear lighting for a memory preset, very often the cast have flashbacks to denote this I decided that I would have a lighting state that we could go to and then build on per scene. With this is mind I decided to use the lanterns as rear light, and to add the 2 yellow parcans for this baseline state.
For the cyclorama I chose blue, Mauve and Yellow. I choose a mauve L126 as I thought it would enhance the India scene as well as adding a romantic air to a scene where necessary.

For my floor fresnels I choose Medium Amber L020 as with many of my gel choices on this list I was guided quite extensively by the notes for each colour that Lee provided. This orange was suggested to be great for side lighting, exactly what I was looking for.

My final gel choice was for when the audience (freedom PC) was lit as if they were in a gym, here I ran the risk of making them too bright and detracting from the stage, I therefore kept the warmth I had built from my other gel choices but made these lanterns a burnt yellow L770.

My final decisions to be made were in regards to gobos, I wanted to add texture to the stage area using a series of 4 profiles, labelled texture. I discovered that college already had 2 identical gobos, so I decided after asking my tutor for advice on purchasing another 2 of the same.


These were called pine branches with the gobo number 77107. I know that Rosco produced these so inspected their website to ensure they still made this design

Another gobo that I required was that of a window gobo, I had seen window gobos that were a skewed rectangle, and given the seating rake I though these would fit nicely into this space this was to be 77643 and when rotated 90 degrees worked very well and really helped to give the feeling required by ther director that audience members were walking into a gym.

Now I had completed my gel call, I spoke with my tutor about it, as has already been mentioned we changed the Yellow L101 to L767. As a method of reducing the expenditure where possible I substituted colours, e.g. the floor fresnels were given L770 this meant that we were effectively using as much of the gel sheets bought as possible.
Also during this conversation with my tutor we spoke about colour mixing on the cyc, due to my inexperience with using cyclorama this had not occured to me. As such we changed the 3 colours on this bar (LX4) to 4 sets of 3 using the primary colours though here i did bring in the primary red gel instead of using the L027 I had in the parcans, this decision was made because as we were now colour mixing, the nearer to the primary colours I could get, the easier the mixing would be.


However as mentioned when this blue came to be ordered I couldn’t get it in High Temperature (high temperature is special gel which is often supplied as an alternative with the darker colours, as it’s name suggests it can with stand a higher temperature than regular gels and is thus less likely to burn through as quickly and need replacing). So L120 was substituted.

As can be seen on the notes both the primary red and green were to be good for cyclorama lighting, and the blue was suggested by the supplier as being the nearest in hue to the original order.


The above image shows a comparison of my two gel lighting plans you can clearly see the changes made.
My next task was to create a gel call, this is a list of how many lanterns are using a particular gel, and is used for both cutting gels and working out the order.
Lxfree has the inbuilt ability to create a colour call but as I have previously stated,it uses different symbols for other lanterns it would produce an incorrect call. I have included it here for reference only.
The method I employed was to create a spreadsheet
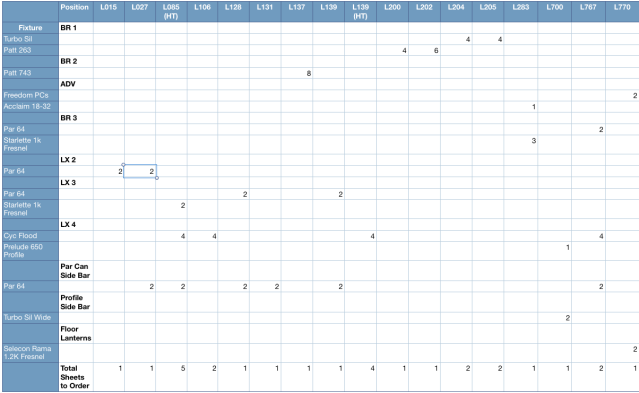
and to count up per bar what lanterns were using what gel. I then used an app Lx Handbook to work out my gel order screen shots below to show the processs.


A quick note on sheet sizes, I needed to remember that High Temperature sheets come in half the size of a regular sheet. As listed on the Lee website, when you have chosen a colour near the bottom of the page this information is listed. below is the example of 120 Deep Blue

You may notice that some gels were over ordered this was at the suggestion of my tutor, it was possible that some may burn out and need replacing through the run of the show. Also due to my choice of colours it was likely that these would be needed in subsequent college shows so more was ordered than strictly necessary.
These were ordered alongside the gobos. Upon arrival I checked off the delivery note against the delivered products. The total cost of this gel order was £234.

You will notice that china markers are also on this delivery note, these are a special kind of pencil which allows us to write on the gels. Once checked I then proceeded to cut the gels using the templates we had made, a cutting mat and a stanley knife. I made sure to mark each one with lantern type, bar number, gel colour (I also ensured that the rest of the sheets were marked with gel number for later reference). These were then stacked by lighting bar in order from SR – SL and placed in a plastic wallet which was also marked. Once complete these were put into a LX boxes for transport to the venue. I ensured whilst packing that I also took my spare gel sheets, china marker, scissors and templates.
Returning to the lighting plan it was necessary for me to create channel numbers for each lantern. This required a lot more thought than I realised it would. It was suggested that I try and mumber in a logical way by grouping lanterns together. As this was my first time of numbering in this way I found it quite difficult, and even though I had numbered them when arriving at the venue I still had not memorised them (which I hoped by numbering them myself I would have done).
The channel numbers can be seen in the following image.

When creating these numbers I thought that I would use the less likely to be used lanterns at higher numbers, I also bore in mind my potential lighting states that I needed so which lanterns were likely to be in groups. I also needed to remember which lanterns on BR1 were paired. I then literally just began. Starting from BR1 to get the washes nailed down first and working ahead. The lanterns that had no focus I left till the end, this was an error on my behalf as doing it this way in separate occasions allowed me to make the error of duplicating channel numbers. Unfortunately neither I nor the operator noticed these repeats. It wasn’t until the rigging day at The Brewery that these faults began to show. Luckily it wasn’t too many lanterns so could be fixed easily. I ensured when correcting my error to not change any channel numbers of those used in washes or groups. Again by chance non of these lanterns were affected from this error.
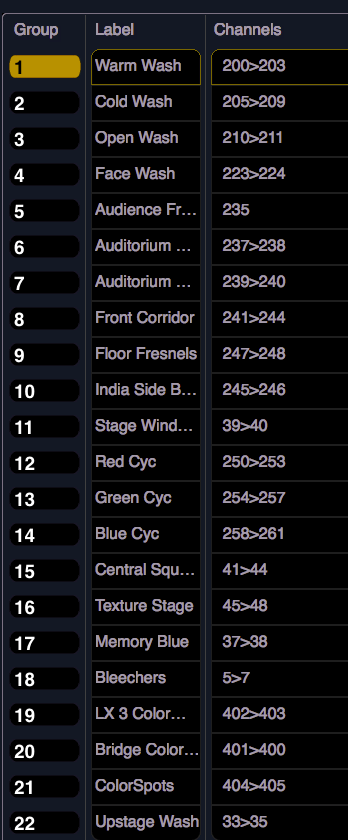
Once I had my channel numbers sorted, obviously not realising the error above I then created groups lists for my operator, I also suggested subs and particular lighting states.
Groups
Warm Wash – 200, 201, 202,203
Cold Wash – 205, 206, 207, 208 ,209
Open wash – 210, 211
Face wash – 223,224
Face out – 220, 221, 222, 223 224, 225, 226, 227
Audience fresnels – 235
Auditorium window – 237, 238
Auditorium wall – 239, 240
Front corridor – 241, 242, 243, 244
Floor Fresnels – 247, 248
India Side boom profile – 245, 246
Stage windows – 39, 40
Red Cyc – 250, 251, 252, 253
Green Cyc – 254, 255, 256, 257
Blue Cyc – 258, 259, 260, 261
Central Square – 41, 42, 43, 44
Texture stage – 45, 46, 47, 48
Memory blue – 37, 38
Bleechers – 5, 6, 7
LX3 Colour Washes – added by operator
Bridge Colour washes – added by operator
Upstage wash – added by operator
Midstage Wash – added by operator
Downstage wash – added by operator
Subs
Red Cyc – using the channels from the red cyc group
Green Cyc – using the channels from the green cyc group
Blue Cyc – using the channels from the blue cyc group
Band
36 @50%
75 @ 25%
gym auditorium
Audience Fresnels @ 100%
Audience Wall @ 80%
Audience Window @ 100%
Gym – Warm wash @70
Face @ 30
9@100
11@100
223, 224 @ 30
Once these were in place I could finally begin to build my cue list, as talked about earlier I had constantly been updating my potential cue list and script during the previous weeks, so I opened my spreadsheet and script and went through it step by step. As I came across a lighting state that I knew I would need again I made a note, and then in subsequent referenced this cue. If any changes were to be made, I referenced the cue and then stated which channels were changed.

As can be seen in the image above very early on I started to recall cues
Cue 9 recalls cue but with channel changes.
Cue 12 recalls cue 11.
Once I had completed this document I sent it to my operator, as previously mentioned I sent it to him in stages. Once I had completed act 1 and then this final edition. I will state here however that the file labelled hillary cues was my still working document. It was now time for the get in and cue to cue.
